AcroTrain
e-Learning System
Administrator's
Guide
Prepared by
L.A. Grime & Associates, Inc., AcroServices
860 Sandalwood Road West
Perrysburg, Ohio 43551
Phone: 419.872.9999
www.acroservices.com
©
L.A. Grime & Associates, Inc. 2000-2005
Contents
Detailed
Contents
CHAPTER
1 - ACROTRAIN INTRODUCTION
SYSTEM
REQUIREMENTS
INSTALLING
THE PROGRAM
RESOURCES
CHAPTER
2 - COURSEWARE AUTHORING AND EDITING
COURSEWARE
AUTHORING AND EDITING
ACROTRAIN
AUTHORING LEVELS: Courses, Modules,
Topics and Questions
USING
ACROADMIN
VIEWING
LEARNER RECORDS AND EDITING REGISTRATION
CREATING
AND GENERATING ASSESSMENTS
CREATING
REPORTS
APPENDIX
A - SETTINGS MATRIX
APPENDIX
B - TROUBLESHOOTING AND ERRORS
APPENDIX
C - TUTORIAL
A
FINAL NOTE
Detailed
Contents
CHAPTER
1 - ACROTRAIN INTRODUCTION
SYSTEM
REQUIREMENTS
INSTALLING
THE PROGRAM
Executables
and Support Files
Folders:
Files:
AcroTrain
Libraries and Records Folders
Records
Folder
Libraries
Folder
RESOURCES
Guide
Online
Help
For
Further Assistance
CHAPTER 2 - ACROTRAIN AUTHORING AND EDITING
AcroTrain
AUTHORING AND EDITING
Launching
AcroEdit
AcroTrain
Program Settings and Options
Records
Directory
Revised
Administrative Password
Use
the Username Drop-Down List
Sort
the Course List Alphabetically
Log
Times
PowerPoint
Program Priority Sequence
Permit
Learners to Unregister Courses
Systen
Version
Include
Post-Exam Reviews?
Client
Post-Copy Comment
Use
Defaults
Set
Login Fields
Publish
View
Current Selections
ACROTRAIN
AUTHORING LEVELS: Courses, Modules,
Topics and Questions
Courses
View
Available Courses List and Access System Settings and Functions
Audit
Course
File
Check
Adding,
Deleting and Modifying Courses
Adding
a New Course
Importing
a Course
Deleting
a Course
Recovering
a Course
Modifying
the Course Settings
Setting
the Course Directories (Folders)
Course Access Code
Use Access Code
Hidden course
Course Revision Number
Completion Certificate
Resize Screen
Exam-only course
Cover the Desktop with Black
Use Introduction Screen and Intro File:
Exit File
Use Review Mode
Use Sound
Hide Task Bar
Use Review Mode
Hide Flow Options
Use
Instruction Boxes
Use Program Internal Help or Open Help in Browser Always
Show Objectives
Light Text and Dark Text Options
Include
an Assessment with this Course
Use
Web Help
OK Button
Modules Button
Cancel Button
Defaults Button
Background
Intro File and Exit File
Course
Name Button
Advanced
Course Settings
Modules
Add
a Module
Deleting
a Module
Modify
a Module
Topics
Adding
a Topic
Deleting
a Topic
Modifying
Topic Settings
Questions
Using
the Topic Exercise and Question Editor
Multiple-Choice
Questions
Question
Feedback
Supplemental
Information
Tries
Limit
Use
A, B, C ...?
Review
File
Deleting
a Question
Changing
a Question Type
True/False
and Yes/No Questions
Short
Answer Questions
Drag
and Drop Questions
Matching
Questions
Adding
Question Keywords
Import
Questions from Another Topic File or a Text File
Corrupted
Question File Detection and Too Many Questions Warnings
AcroTrain
Question Parameters, Keywords and Types Matrix
Authoring
Survey Questions
Manually
Checking and Editing Topic Files
Checking
Dependent Course Files
CHAPTER
3 - ACROTRAIN ADMINISTRATION
USING
ACROADMIN
VIEWING
LEARNER RECORDS AND EDITING REGISTRATION
Course
Administrative Tool
Add
Learners
Import Learners from an Existing Database
Delete Learners
Edit Learner Data
Register and Un-register Learners for Courses
Add
External Course Information for Learners
CREATING
AND GENERATING EXAMS
Modifying
Existing Assessments
Assessment
Data
Compound
Assessments
Assessment
Features
Paper
Assessments
Surveys
Permit Retakes
Suppressing
Question Feedback
Multiple Session
Assessments
Intro File
Assessment Directions
Assessment Summary Report
Assessment Final Page
Question Reviews
Partial
Course Credit Assessment Settings
Selecting
a Course to Credit on Assessment Completion
Evaluate Score for Each Module
Evaluate Overall Exam Score
Evaluate Using Keywords
Keyword Question Report
Assessment
Question Specications
Assessment
Types
Assessment
Close Options
Run
a Program on Exam Completion
Assessment
Certificates
Summary
Report on Exam Completion
Auditing
Assessments
CREATING
REPORTS
General
Fields
Course
Fields
Module
Fields
Topics
Fields
Question
Fields
Pass/fail
and Question Reports
Pass/Fail
Report
Question
Report
APPENDIX
A - SETTINGS MATRIX
APPENDIX
B - TROUBLESHOOTING AND ERRORS
APPENDIX
C - TUTORIAL
A
FINAL NOTE
Chapter
1 - AcroTrain Introduction
AcroTrain is an
e-Learning system that allows users to create computer-based training (CBT)
programs using PowerPoint® files without programming knowledge. The program
permits incorporating information from HTML files, editing numerous types
of learner interactivity and from other programs. The system includes a learner
and course management system, course content manager, question editor and
random test generator.
Many professionals
already use PowerPoint to accomplish training tasks because it is easy to
use, it effectively blends bulleted lists with multimedia and viewers feel
comfortable with its presentation format. PowerPoint, however, cannot perform
many necessary e-Learning functions: registering learners; tracking material
completion; evaluating responses to questions; creating and administering
tests; interfacing with existing course management systems; and interacting
with complex scenarios. With AcroTrain it is easy to achieve these functions.
You can take PowerPoint out of the classroom onto your company's network or
into your e-Learning lab.
Many CBT authoring
systems have significant disadvantages: some users find them difficult to
program; most cost several thousand dollars each; and no single industry standard
program exists. Consequently, many companies possess only one or two authoring
system licenses and there are often only one or two individuals per company
who can produce and modify programs.
AcroServices' approach
features the best of both (PowerPoint and CBT) worlds. PowerPoint is used
for all the functions it can accomplish; it is then merged with an e-Learning
authoring system to accomplish the interactivity necessary to ensure and verify
the success of the learners. The result is an integrated program that uses
PowerPoint for content and easily modified interactivity templates for e-Learning
functions.
Add interactivity
to PowerPoint presentations with the AcroEdit. Write questions in various
formats: multiple-choice, true/false, yes/no, matching, drag and drop, fill-in
and detailed scenario based questions. Add modules, topics, workshops and
exams to define and present a complete course. Select your desired appearance
template or use your own graphics to create your own 'look and feel.'
Applying the systematic
approach to training with AcroTrain is easy. After identifying the specific
tasks the learners must master, you will find it simple to implement the course
objectives, formative questions, final assessments and content for each topic.
You can construct a modular course with any number of modules, topics, sub-topics,
workshops and exams. You also control topic prerequisites and menu position.
Add and edit your course information in any sequence desired.
The AcroTrain exam
generator permits paper exams or computer testing. Exam questions are protected
through encryption. Customize the exam to meet your desire to emphasize certain
topics and questions that measure specific learning outcomes.
The built in course
manager allows options for multiple courses, learner preregistration, course
access codes and registration by name and/or number. The program features
include extensive learner progress tracking, and AcroTrain records learner
comments.
This guide will
address the AcroTrain structure and capabilities. Even though it is not necessary
to read this entire guide before beginning your first project, reading this
guide will help you understand the concepts and structure of this e-Learning
system.
Conventions
Various development
screens include 'OK,' 'Cancel' and 'Apply' buttons. Normally the buttons function
as follows:
OK - Saves current
changes and returns to the previous screen or proceeds to the next screen.
Cancel - Abandons
changes since the last save operation and returns to the previous screen.
Apply - Saves
the current screen and rewrites the current screen
The '>' symbol
separates sequential steps in abbreviated instructions. For example, AcroEdit>Select
a course>Course Settings>Check Completion Certificate means:
- Open AcroEdit
including entering the required access code.
- Select a course
from the list on the next screen
- Click the
Course Settings button
- Click the
'Completion certificate' check box.
System Requirements
Minimum authoring
and hosting system requirements:
Processor: Pentium I or better
Memory: 16 MB RAM or more for Windows 98. More memory improves performance.
Other operating systems require more memory.
Operating System: Windows 98, NT 4, ME, 2000, XP Home or XP Pro
Video: 800X600 resolution and 16-bit color
Storage: 30 - 75 MB of free hard drive space for AcroTrain and 15 typical
courses. Actual requirements can vary significantly.
Software: PowerPoint 97®, 2000, 2002 or 2003 and Internet Explorer®
or Netscape 4.0® or above
Minimum learner
system requirements:
Processor: Pentium
I or better
Memory: 16 MB RAM or more for Windows 98. More memory improves performance.
Other operating systems require more memory.
Operating System: Windows 98, NT 4, ME, 2000, XP Home or XP Pro
Video Monitor: 800X600 resolution and 16-bit color
Storage: No permanent storage requirement
Software: Internet Explorer® or Netscape 4.0® or above. A PowerPoint
viewer or program is required. The 2003 PowerPoint viewer is available with
AcroTrain. AcroTrain can install the recommended PowerPoint Viewer 97 if
none is detected when a learner launches the system.
Installing the Program
You may install
this program in a variety of settings (i.e. over an intranet, in a CBT lab
or on individual PCs); Read this entire guide before installing the course
if you have unique network requirements, special lab setup requirements, special
learner tracking needs or special learner reporting needs. Use the quick installation
steps below to begin using your program immediately with the default settings.
Chapter 2, 'Courseware Authoring and Editing' has additional program file
setting information.
Quick installation steps:
- Insert the AcroTrain
disk into your CD-ROM drive, or if you downloaded the program, run the setup.exe
file.
- Follow the prompts
to customize the installation and select the program destination.
After installing
AcroTrain, see this guide for program, course and utility options that will
help you customize the program. A brief introductory course comes with the
AcroTrain e-Learning system. You may displace this course or make it a hidden
course that is not listed for learners using AcroEdit.
AUTHORING
TIPS - Many users prefer to have an 'authoring' and a 'learners' AcroTrain
installation. They use the 'authoring' installation to prepare and test their
courses. They then copy the necessary files to the 'learners' installation.
The 'Publish' function will copy the needed files from your 'authoring' installation
to the folder you select.
You
may also deliver your courses via CD-ROM. See the 'Records Folder' discussion
in The Chapter 2 'Courseware Authoring and Editing'
section.
The following information
will familiarize you with the different file types, their location, their
functions and their potential configurations.
Executables
and Support Files
These files and
folders are in the 'root' AcroTrain folder that you designated during the
installation. For example, if you install the program in a folder named
'AcroTrain' then all of the following folders will be found and MUST reside
in that folder.
Folders:
Installs
- This folder contains the PowerPoint® 97 viewer that the program
loads on the learner's computer if PowerPoint® or the viewer is
not already located on the learner's PC.
Hint:
If you do not wish to permit learners to install the PowerPoint viewer,
remove the PowerPoint file(s) from the Installs folder.
Xtras
- This folder contains most of the functions that the program uses
at run-time. If this folder is moved, the program will NOT function
properly. This folder also includes the PPTView subfolder that contines
the PowerPoint 2003 viewer.
PPTView
- This
Xtras subfolder contains a complete PowerPoint 2003 viewer installation.
It is used for presenting review PowerPoint files. The viewer will present
the slides in full screen mode. This PowerPoint installation makes no
registry entries on the computer where it is installed.
Files:
Login.exe
launches the course management interface for learners to register
and to launch courses. For more information on setting-up the course
management interface (CMI), see chapter 2, 'Courseware Authoring and
Editing.' Course administrators use the AcroAdmin utility to add, modify
and delete learner information. Use AcroEdit to define course and program
settings.
If you have
an existing course management system, contact AcroServices for information
on interfacing AcroTrain courses with your course manager.
AcroTrain.exe
launches and runs the course selected through the course management
interface. For more information on setting-up the course management
interface, see the Section on 'Courseware Authoring and Editing.' This
file requires that learners enter from a course management system to
get course credit (i.e. Logon.exe or equivalent must be launched first).
AcroEdit.exe
launches the program and content management system. Administrators will
use this utility to build courseware, set program and course options
and edit course content. The 'Courseware Authoring and Editing' chapter
provides editing information. This program requires the 'admin' password
to open.
AcroAdmin.exe
launches the program information retrieval and management system. Use
this to view learner information, generate reports and generate manual
or random exams. The 'Courseware Administration' section provides administration
instructions. This program requires the 'admin' password to open.
AcroFinal.exe
launches the final exam program. This file requires that learners enter
from a course management system to get course credit (i.e. Logon.exe
or equivalent must be launched first).
QuickEncrypt.exe
launches a program that allows program administrators to encrypt or
decrypt exam questions. This program requires the 'admin' password to
open.
AcroTrain.ini
stores program settings for the CMI options, the login options, the
'records' folder location and the available courses list. The 'Courseware
Authoring and Editing' section provides information on setting functions
and modification.
AcroIntro.ini
stores the course settings specific to "The Introduction to AcroTrain
Training Program." Chapter 2 discusses the course settings options.
If you create other courses, the course .ini file will be named the
same as the course short title that you supply when creating the course.
Your course .ini files must remain in the 'base' AcroTrain folder.
Admin_Guide.html
provides help to the program administrators while using the AcroTrain
utilities (i.e. AcroAdmin and AcroEdit). The file is a copy of this
manual in HTML format. This file must remain in the same folder as the
program utilities.
Printcert.exe
displays and prints AcroTrain generated certificates.
Other
Support Files including the following MUST stay with the program
files listed above for the program to operate properly:
- 3Dviewer.dll
- buddy16.dll
- Buddy32.dll
- FolderPick.dll
- PSTrain.dll
- winapi.u32
- a4vfw.xmo
- a4vfw32.xmo
- COVER.u32
- MEMTOOLS.U32
Other files
may appear with the above files. Moving or modifying these files may
prevent proper program operation.
Dependencies
- Most support files required by AcroTrain are in the 'Extras' folder.
Other dependencies include the Microsoft C Runtime Library and the VB
Virtual Machine. These are installed on the typical installation that
will usually permit an AcroTrain installation to be copied from one
location to another, instead of doing an installation. With the copy
approach, you may need to redefine the library locations if they are
not relative, and files may have to have their 'read only' attribute
reset.
A dependent
file that occasionally is not available on learner's computers is mscomctl.ocx.
The Login.exx program relies on this .ocx file. The Login program checks
the learner's computer for this file. If it is not found in the expected
Window directory, the learner will receive an error message advising
them to contact their adminstrator. This file may be obtained from the
Microsoft web site and various other sources. I may simply be copied
to the Windows folder.
AcroTrain
Libraries and Records Folders
These folders
and their contents do not have to reside with the program executables and
support files. Use AcroEdit to designate their location. Chapter 2, 'Courseware
Authoring and Editing' provides setting modification information.
Records
Folder
The AcroTrain
'Records' folder contains the active AcroTrain system managed learner
records. Set the records folder location using the AcroEdit program. This
is a system level setting so that no matter what course the learner is
completing, AcroTrain records their progress in this central location.
AcroTrain creates one folder per learner under the records folder. In
the learner folder, AcroTrain generates data files for each course and
updates these files as learners advance through courses and exams.
NOTE: Learners
and course administrators must have read and write access to the records
folder.
Student.txt
- This file stores the registered students list. View this information
using the administration utility, AcroAdmin. Chapter 3, 'Courseware
Administration' provides AcroAdmin instructions.
Libraries
Folder
The AcroTrain
'Libraries' folder(s) location is set under the 'Course Settings.' This
folder contains several important folders and files needed at program
run-time. The following describes the subfolders and their contents
in the 'Libraries' folder:
NOTE:
Course administrators must have read and write access to the 'Libraries'
folder. Learners should have read only access.
Graphics
Folder - This folder stores most system graphics files; exceptions
include files embedded in PowerPoint presentations, help images and
HTML images. You may modify graphics in this folder; however, the
file name must remain the same so that the graphic can remain linked
to the program. Graphic attributes such as size, and format should
remain the same as the original file attribute. All courses that list
the same graphic folder will share the graphic.
If you
need a custom graphic for a particular course, copy the entire folder
to a new location; then revise the desired graphics. Use AcroEdit
to redirect the course to the new folder location.
Help
Folder - This folder stores system AcroTrain instructions. Learners
view the system help functions when they use the 'Instructions' button.
You may
add files to provide course specific HTML files that learners launch
using the AcroHelp button. Each course topic may have a different
AcroHelp file. Use AcroEdit to designate the help folder when you
include custom course help files.
Graphics
used with AcroTrain instructions reside in the Images subfolders.
The help
folder also has the run-time instruction files that the learner uses
while completing a course if they need to know how to complete a certain
task. These files are listed below and must be included within the
'Libraries' structure for all AcroTrain courses. You may modify the
following instruction files to tailor them to an individual course.
The file names must remain the same.
HelpIndex.html
- General help index. This file may require modification depending
on the help you use for a given course.
InstructionsIndex.html
- General instructions index. This file is normally not modified.
L_exercises.html
- Learner instructions on how to complete the various program
questions.
L_mainmenu.html
- Learner instructions on how to use the program main menu.
L_topicmenu.html
- Learner instructions on how to use the program topic menu.
L_taskbar.html
- Learner instructions on how to use the various taskbar features.
L_presentations.html
- Learner instructions on how to complete the course presentations.
AUTHORING
TIPS
- Create basic HTML pages using Word or any word processor that can export
a document in HTML format. For complex pages and features use an HTML editor
program such as Dreamweaver or FrontPage.
You can add as many hyperlinked pages for learners to view as desired. These
can provide the speaker notes from your PowerPoint files, in depth text that
discusses the topic, topic related procedures, regulations or guidance documents.
If desired you may add one help file in HTML format per topic to the 'Help'
folder. Name it the same as the PowerPoint file and text file for each topic
(See discussion on the 'Presentation' and 'Text' folders below) to make your
file selection and subsequent revisions easier. These files may include hyperlinks
to an index or outline for each source of information. You may add subfolders
to the Help folder to provide whatever support level desired.
Create an EPSS (electronic performance support system) from your AcroHelp
HTML files by adding a topical index with links to launch the various AcroHelp
documents. After completing training, learners can directly launch the index
HTML file. They will then be able to view the documents they experienced during
training as they complete the tasks or experience the situations they learned
about.
HTML Folder
- This folder stores miscellaneous HTML files. AcroTrain uses these
files for the course introduction pages and the supplemental information
used in interpretive exercises or exams. The intro HTML file runs each
time the learner launches the course by default. You may disable this
feature for a particular course. Each course may have a different introduction
file, and you may modify the default intro HTML file. Use AcroEdit to
designate the course introduction file.
This folder
is normally unique for each course. See chapter 2, 'Courseware Authoring
and Editing,' for detailed information on how to setup this folder.
AUTHORING
TIP
- Present course level objectives by adding an objectives page to the course
introduction file. AcroTrain will also provide features to present module
level and topic specific objectives. Also, you may prefer to present objectives
in your PowerPoint slides or you may wish to exclude objectives.
Presentations
Folder
- This folder stores the course PowerPoint® files. There is one
file per topic and they may be named the same as the text and HTML files
for each topic to facilitate course editing. You may initiate modifications
to these PowerPoint files using AcroEdit or you can open PowerPoint
and select the file that you wish to modify.
This folder
is normally unique for each course. See chapter 2, 'Courseware Authoring
and Editing,' for detailed information on how to setup this folder.
Text Folder
- This folder contains topic text files. There is one text file per
topic and AcroEdit automatically names them using the 'short title'
you designate when you add a topic. These files store the topic information
and settings. The topic information and settings include several options
or information that will be discussed in detail in the chapters on 'Courseware
Authoring and Editing' & 'Courseware Administration'. The folder
also includes an 'Exam' subfolder with text files for each course exam
created with AcroAdmin.
This folder
is normally unique from course-to-course. See chapter 2, 'Courseware
Authoring and Editing,' for detailed information on how to setup this
folder.
Click
here to branch to Setting the Course Directories
(Folder)
Resources
Administrator's
Guide
This "AcroTrain
e-Learning System Administrator's Guide" is available on the Web at
http://www.acroservices.com/newAS/Admin_Guide/Admin_Guide.htm.
Online
Help for Learners
AcroTrain has
online help functions for learners when they are using AcroTrain. This help
system features two help categories; AcroHelp for subject matter help during
course presentations and instructions for AcroTrain program directions.
The AcroTrain
e-Learning System AcroEdit and AcroAdmin utilities help launches the Web
copy of the Administrator's Guide..
For
Further Assistance
If you are in
need of further assistance that is not covered in this guide, please call
for technical support at 419.872.9999 or e-mail support@acroservices.com.
Chapter 2 - AcroTrain
Authoring and Editing
As an AcroTrain
license holder, you may author any course that you wish to author except
courses pertaining to regulation 10 CFR 50.59 or Nuclear Regulatory Commission
Generic Letter 91-18 operability determination programs and the related
NRC Inspection Manual chapters. These are nuclear industry specific programs.
Both programs are already authored and may be licensed for use by contacting
AcroServices. The primary utility used for authoring and editing is 'AcroEdit.'
This chapter explains how to put this utility to work for you.
AcroTrain Authoring
and Editing
Launching
AcroEdit
To launch the
AcroEdit utility you may use the shortcut created on your start menu by
the AcroTrain install program, go to the directory and create a shortcut
or directly double click the AcroEdit.exe file in it's installed folder.
After the utility launches, enter the password and your name, then you
will see a brief introduction screen. 'Admin' is the default password.
AcroTrain
Program Settings and Options
The Introduction
screen provides a brief AcroEdit overview. From the introduction screen,
continue to the list of courses on the 'Course' authoring level screen.
Before setting-up or modifying individual courses, you may wish to set
the 'Program Settings.' Program settings apply to all courses that share
your AcroTrain authoring system installation. Click the 'Program Settings'
button on the 'Course' authoring level to view and revise these system
level settings:

Records
Directory
This option
allows you to put the learner records in a directory (folder) of your
choice. AcroTrain will create your designated records folder if it doesn't
exists. The default records folder is named 'Records' and is a subfolder
one level below the folder where you install AcroTrain. To designate
a different folder location, deselect the 'Use a relative records
directory' check box. This enables the 'Set Records Directory'
button. Click the 'Set records directory' button and enter the desired
folder or browse to select the desired records folder.
You may establish a non-default relative records directory by first
setting the directory using browse or direct entry; then check the 'Use
a relative directory' box. If your designated directory is a directory
located in a subfolder to the AcroTrain installation root folder, the
path to the root folder will be replaced with '<FileLocation>.'
This indicated that the records directory will be set relative to the
root folder when you publish your installation to a network, CD-ROM
or another PC.
WARNING!
If you have registered learners and wish to preserve existing course records,
prevent system use when changing this setting. Manually move the existing
records to the new folder before permitting learners to use the system.
If you wish
to run AcroTrain courses from a CD-ROM, DVD or similar portable media,
you must designate the full path and records folder name. AcroTrain
recognizes 'C:\AcroTempRecords' as a temporary records location for
use by one learner that can be deleted following each use. Learners
will be prompted when they exit to either save of delete their course
record. They must preserve the record if they wish to continue a course
from the point where they left off. If they've completed the course,
they can delete the record unless required for documentation. This approach
permits most learners to take an AcroTrain course from a CD-ROM without
installing any software on their computer or leaving files on their
computer withour their knowledge. ***See the discussion in Chapter ***
for additonal information on CD-ROM and removabe media.***
Never use
the 'C:\AcroTempRecords' folder if multiple users will take courses
using the same computer. The second learner can delete records that
the first learner may need.
AUTHORING
TIP - When publishing your courses on portable media designate records
folders on the learner's C: drive or other drives that you can verify will
be present on the learner's computer. If uncertain, you can offer multiple
complete installations with one that includes the C: drive for use when the
preferred drive is not available.
If you wish
to run AcroTrain from a CD-ROM, but do not wish to give the learner
the option to delete their temporary records, designate the records
folder as a fixed location other than 'C:\AcroTempRecords.' If the location
is on the learner's computer, the records will remain until manually
deleted.
To automatically
merge CD-ROM generated records with your existing records, designate
the full path to your network location for the records folder.
A third CD-ROM records
folder option is to designated a folder on the A: drive as the records
folder. AcroTrain will store the learner records on a floppy disk that
the learner can return to the administrator. To view the learner records,
the administrator can insert the floppy disk in their A: drive using
an AcroTrain installation with the same folder designation as used by
the CD-ROM courses. This approach will function with other removable
data storage media such as a Zip disk if the complete path can be entered
in the AcroTrain program settings.
WARNING!
Learners can access records on a floppy disk and other uncontrolled media.
This includes changing grades, question responses, times etc. Encrypting some
data and using exam summary files limit the ability of individuals to modify
records. When exam security is critical, use a proctored exam.
Revised
Administrative Password
Record the
desired administrative password for future reference, then enter the
new administrative password.
WARNING!
You must remember the new password. This password
applies to AcroAdmin and AcroEdit.
Use
the Username Drop-down List: When learners login you can include
a drop-down list for selecting usernames.
Sort
the Course List Alphabetically: Check this
box and the unregistered courses will be listed alphabetically when
learners login. If unchecked, courses will be listed in the sequence
they were entered. This is the sequence for the course list in AcroEdit.
To change the entered sequence, displace courses, then recover the courses
in the desired sequence. Login will add the word 'Exam' to exam only
courses. All such exam only courses will appear together if sorted alphabetically.
Log
Times: The log feature collects timing and computer system data
in a common file named "LogFile.txt." The file location is
in your designated records directory. This file may also include entries
about selected error messages received by learners.
WARNING!
Each course taken by each learner will add a page
to several pages to this file. It can become quite large. If the file becomes
too large it could adversely impact performance. Periodically delete the file
or delete the old file entries. Keeping the file to 2 Mb. or smaller should
provide good performance with most installations.
PowerPoint
Program Priority Sequence:
There are
several programs that may be used to present the PowerPoint files for
each PowerPoint topic.
|
PowerPoint
Presentation Program Options
|
| Option
No. |
Description |
|
1
|
PowerPoint
97 Viewer |
|
2
|
PowerPoint
97, 2000, 2002 or 2003 (Whichever is registered on the learner's
computer.) |
|
3
|
Offer
to install the PowerPoint 97 Viewer |
|
4
|
PowerPoint
2003 (full screen) Viewer
|
|
5
|
Application
designated for .PPT files (Full Screen) |
To indicate
your preferred program, use AcroEdit to designate this program setting.
From the course selection page Click the 'Program Settings' button,
and then enter the number representing your preferences.
For example,
if you would like to have AcroTrain check first for the PowerPoint 97
viewer, next the full PowerPoint program, then the PowerPoint 2003 Viewer
and finally if none of these programs is found, to offer to install
the PowerPoint 97 Viewer; enter number 1243. If you wish only to use
the PowerPoint 2003 Viewer, enter number 4. The default value, if no
number is entered, is 12345.
PowerPoint
factors to consider:
- The two
PowerPoint viewers are free players provided by Microsoft.
- If multiple
PowerPoint versions are installed on the learner's computer, and you
are using option 2, AcroTrain will use the path and filename found
in the designated registry location for the PowerPoint program.
- If your
course requires macros to present your presentations, you must use
the full program option 2.
- If you
create your presentation using PowerPoint 97 - 2002, you should be
able to rely on any of the options to present the slides. However,
in PowerPoint 2003 there are some new transition effects that are
not supported by the older viewers or programs. Avoid these features
or use option 4 to present your slides.
- The PowerPoint
2003 viewer can only be presented full screen due to a bug. This means
learners will not have access to the AcroTrain controls. If your program
is not set to resize the screen, and if the learner's screen size
is set higher than 800 X 600 pixels, the transition to the presentation
will be noticeable. This option is very reliable since the needed
software is in the AcroTrain Xtras folder, and the free viewer requires
no installation or registration. Include this option to force full
screen presentations and to assure learners will have a reliable presentation
program.
- If PowerPoint
is installed on a learner's computer, but AcroTrain is unable to find
it, uninstall and then reinstall the PowerPoint program or viewer
on the learner's computer.
- Using
the application designated for .PPT files should be limited to situations
where you have control of the learner's computer settings. This setting
may not exist on some learner's computers even if they have PowerPoint
or a viewer installed.
- If your
PowerPoint presentation runs full screen learners will not have access
to the AcroTrain navigation controls such as comments, AcroHelp and
slide forward and back.
To indicate your preferred program, use AcroEdit to designate this
program setting. From the course selection page click the 'Program
Settings' button, and then enter the number representing your preferences.
For
example, if you would like to have AcroTrain check first for the PowerPoint
97 viewer, next the full PowerPoint program, then the PowerPoint 2003
Viewer and finally if none of these programs is found, to offer to
install the PowerPoint 97 Viewer; enter number 1243. If you wish only
to use the PowerPoint 2003 Viewer, enter number 4. The default value,
if no number is entered, is 12345.
- We have
received reports that the PowerPoint 97 viewer loads faster and performs
better than the PowerPoint program. This may not hold true with all
operating systems, hardware configurations and program versions.
Permit
Learners to Unregister Courses: If clicked, learners will be able
to unregister courses themselves. To unregister a course Learners may
remove a course from the registered courses list after logging in to the
AcroTrain e-Learning System.
When learners single-click
a registered course, the 'Remove' button appears. Clicking the 'Remove"
button moves the course from the registered course list to the unregistered
course list. If the removed course is a hidden course, it will still
appear on the unregistered course list. This permits learners to easily
re-register for the course in situations when they inadvertently remove
a course. However, the next time learners launch Login, hidden courses
will not appear on the unregistered courses list. Naturally they will
remain available and become registered when learners enter the correct
course access code.
System
Version: Set this to the desired version number. This number can
serve to document your AcroTrain program setting changes. It also is
used with the Client-Host function. The version number can be an alpha-numeric
combination of up to 12 characters.
Include
Post-exam Reviews? Question reviews may be set on a global program
basis using AcroEdit or for individual exams using AcroAdmin. The program
settings are 'Always,' 'Never' or 'Use Settings.'
'Always' Question Review Program Setting
With the 'Always' setting individual exam settings are ignored. Learners
will be taken through a review of their incorrect questions and their
correct questions.
'Never' Question Review Program Setting
With the 'Never' setting individual exam settings are ignored. Learners
will not be able to review either incorrect or correct questions.
'Use Settings' Question Review Program Setting
'Use Settings' is the default setting for systems that have no setting.
With 'Use Settings' individual exam settings will be checked at run
time. The exam settings will determine the reviews that the learners
receive. see the discussion under Creating and Generating Exams for
a description of the exam question review settings.
Clent
Post-copy Comment: Enter comments to present to learners who have
a client installation each time the system configuration files are downloaded
to their computer. See the Publish section for client-server information.
Use
Defaults: Click this button to reset the program
settings to their default values. This button will not reset the login
fields. The parameters that change to default values are:
Records
Directory - <FileLocation>Records
Use a relative records directory - Checked
Revised administrative password - ADMIN|
Sort the course list alphabetically - Checked
Log times - Unchecked
PowerPoint Program Priority Sequence - 12345
Include post-exam reviews? - 'Use settings' checked
Set
Login Fields: Click this button to revise the information that learners
must provide and have the option to provide when they register or revise
their learner data. The minimum required login information is the username
and password.
Login
instructions: Type instructions that you want the learners to
see when they are at the 'Learner Information' screen.
Username
is always visible and required. This information is requested prior
to the screen. The username may not be changed.
Password
is always visible and required. This information is requested prior
to the 'Learner Information' screen. It may be changed, however, on
the 'Learner Information' screen.
First
name options are visible and required. The default setting is
visible and required.
Middle
Initial options are visible and required. The default setting
is visible and required.
Last
name options are visible and required. The default setting is
visible and required.
Employee
ID number options are visible and required. It also has a Min/Max
feature that allows you to set limits on the ID number to tailor it
to your specific numbering format. The default settings are 3 minimum,
9 maximum, visible and required.
E-mail
address options are visible and required. The default setting
is visible and not required.
Department
options are visible and required. The default setting is visible and
not required.
Other
group options are visible and required. You have two options for
this field. Set it up as a simple text entry box like the others or
an option list box. The option list is useful for corporations that
need more work group information than the department alone provides.
In AcroAdmin you can sort records using this field. The default setting
is visible and not required.
AUTHORING
TIP - Use the drop-down list if you plan to sort learner data. The list
avoids learner self-entry problems with alternate terms and misspelled words.

Revising
login field names. Contact technical support at AcroServices for
information on how you can revise the default login field names.
Publish
The publish
function provides several options to prepare run time copies of your AcroTrain
e-Learning System. System Publishing provides master copies for your e-Learning
system that can be used on a intranet, installed on computers in an e-Learning
lab or for e-Learning delivered via a CD-ROM, DVD or other removable media.
'Client System Publishing' provides master copies for delivery over the
web or to remote locations with a 'slow' intranet. Your AcroTrain license
permits multiple copies of run time system files. These may be copied
to intranet locations, multiple computers or distributed via CD-ROM or
other removable media.
The run time
system does not permit course authoring, course modifications that require
AcroEdit, and generating or revising course exams. The AcroEdit.exe file
is not included with run time system copies and may not be added to such
systems without purchasing an AcroTrain license for each copy.
Use 'Copy
to:' to designate the folder that AcroEdit should copy the system
or other files to.
The Records
Folder designation must be set to assure learner records are stored
in the desired location. You may enter the location or browse to the desired
folder. Buttons provide the proper designation for several situations:
Relative: This
is recommended for most intranet installations, stand-alone computer
installations and many removable media systems. The records directory
will be located in a sub-folder beneath the AcroTrain root folder. With
a relative location the drive letter can be different for different
learners, but all will store their records in the designated sub-folder
located 'relative' to the AcroTrain root folder.
To select a relative
directory, you may enter it or browse to the desired folder. The entered
folder must be a sub-folder of your AcroTrain root folder. After entering
the complete path to the desired records folder, click the 'Relative'
button. AcroEdit will replace the drive letter and path through the
AcroTrain root folder with '<FileLocation>.' At run time this
tells AcroTrain to substitute whatever path was used to launch the AcroTrain
system for '<FileLocation>.'
Current:
Clicking the current button will enter the complete path for the current
system based on the records directory setting for the AcroTrain installation.
If you need a relative locations that uses the current AcroTrain program
setting, first click "Current,' then click 'Relative.'
CD-ROM Run:
Use this records folder location for publishing run time systems for
use with CD-ROMs and other removable media that will run from the CD-Rom
or other media with temporary records on the learner's computer.
Use the 'System Publishing'
Copy button to create your run time AcroTrain e-Learning System copy.
Copying may takes several minutes depending on the folder locations and
the system size. Wait
until AcroEdit indicates the copy operation is complete before returning
to the course page.
Client-Host Systems
The AcroTrain Client-Host
feature permits learners to minimize communication with the centralized
run time system installation. With a client-host installation, client
learners receive a client run time AcroTrain installation on their computer.
This limits the need to communicate with the host for records, loading
additional courses and receiving updates. Installations that use Virtual
Private Networks (VPN) for web delivery and other situations when there
is a need to minimize network traffic or when the course content requires
a faster interface than the network can support.
Since Client-Host system
operation is a synchronous application, the learner must remain connected
to the host during training. Users needing asynchronous operation or other
web-based delivery should contact AcroServices for support.
The host system for
client-host installations must be a fully licensed AcroTrain e-Learning
System installation. This is necessary to be able to download the course
and system files needed by clients.
The learner is the client
to the centralized host AcroTrain installation. Learners initiate their
training sessions using a client copy of Login.exe that will initiate
communication with the host Login process. Learners select their courses
from the host course list. The minimum files needed to establish a client
installation are Login.exe and two support files. Copy these files to
a folder on the client computer. This will be the client AcroTrain run
time installation folder. More complete files may be provided to learners
for the client initial installation to reduce the time needed to download
course and system files. The client computer requires a fixed path for
the records folder that is from the perspective of the client computer.
The client also requires a fixed path to the host system root AcroTrain
e-Learning System folder.
Client System Starter
includes the three files required as a minimum to establish a client
installation. This approach will require that all necessary course files
and nearly all system files will be copied to the client computer when
first used by a learner.
Client System Copy
will copy
the complete system files needed by the client. When the learner first
logs in he or she will only need to download the selected course files.
Client System and
Course Copy
copies the complete system files and all course files needed by the
client. When the learner first logs in he or she will not have to download
any files unless the selected course or system host revision is different
than the client revision.
System and course revision
numbers assure that the client system is kept up to date. If the client
course version is different than the host course version, and updated
copy of the course files will be copied to the client installation. Similarly,
the AcroTrain system files will be copied to the client if the version
numbers do not match. Whenever course setting, question, assessment, PowerPoint
file or other content changes the course version should be changed to
trigger a download to the client when a learner selects the course. Change
the system version following program setting changes and program file
updates to assure client system files and settings remain current.
View
Current Selections
Click the down
arrow icon to open a drop-down list of data that describes your current
selections. Click 'Toggle Detail' to open a second drop-down menu with
additional data. This icon remains available on most AcroEdit pages. To
close the list, fist toggle the additional data off, then click the up
arrow.
AcroTrain
Authoring Levels: Courses, Modules, Topics and Questions
AcroTrain uses
authoring levels as shown in the taskbar graphic below. You may use the
taskbar to return to previous authoring levels without saving current settings.
Simply click on the words 'Course,' 'Module' or 'Topic' to jump to that
authoring level. Jumping to a different level may cancel changes made at
the current level such as module setting or topic changes.
AUTHORING
TIP - Authoring levels provide flexibility when applying a systematic
approach to training. A course structure should be planned based on an existing
instructor-led course or using job/task analysis. One corollary is that
the course is like the book, modules are like chapters and topics are chapter
subsections. The questions are in two categories; formative questions that
are like classroom discussion questions and exam questions.
We recommend that topics be kept to just a few PowerPoint slides. After
presenting one topic such as a definition or basic principle, ask one or
more formative questions to verify comprehension or provide practice. Use
the optional review function to return learners to the PowerPoint slide
that answers formative questions.
See
"A Systematic Approach to Training Using AcroTrain" for additional
information.
Courses
View
Available Courses List and Access System Settings and Functions
From the AcroEdit
introduction screen press the 'Continue' button; the available courses
list appears in the box on the left. When editing course, module, topic
or question information, return to this screen by pressing 'Course' in
the Authoring Levels task bar window. The course authoring level provides
access to AcroTrain e-Learning System settings and the publish function.
Click a course
once to select it and to view the selected course information shown in
red text. Once selected, clicking a course a second time opens the course
module list. You can also click the 'Continue to Modules' button to open
the selected course's module authoring level.
To add a course,
click the 'Add' button and follow the on screen instructions. To remove
the selected course from the current course roster, click the 'Delete'
button. To change the selected course's settings, click the 'Course Settings'
button.
Audit
Course
Use the Audit
Course button to launch the selected course in the audit mode. Use this
to preview courses without creating a permanent learner record. The log
function and files that run on exam completion will take place when auditing
courses. This button appears on several AcroEdit screens.
File
Check
The File Check
function is for troubleshooting. See Appendix B.
Adding,
Deleting and Modifying Courses
AcroEdit provides
functions to revise course settings, add additional courses and delete
courses from the course list. To add courses you may create new courses
or import existing courses. Deleted courses are 'displaced' from the active
course list. If the course files are retained, these course may be recovered
or imported, if desired. AcroEdit will not delete displaced course files.
Adding
a New Course
To add a new course, click on the 'Add' button from Course authoring
level screen. AcroEdit prompts you for a course 'Long' title, 'Short'
title, access code, course type and the library folder location. After
providing this information, your new course will be added to the course
list and may be modified or edited like existing courses. Click on the
'Course Settings' button to change the default course settings. Appendix
A shows the default program settings.
Required
new course information:
Full
Title - AcroTrain use the full title as the course name throughout
the program and utilities to identify the course to learners and administrators.
Short
Title - AcroTrain use the short title to identify the course and
run certain program functions based on the course. This title may
not be changed once saved.
Access
Code - An access code must be used to add a course. If you wish
to let the learner access a course without entering a code, then deselect
the 'Use Access Code' option as explained below on the course-settings
page.
Course
Type - There are three available course types:
Regular:
Regular courses have at least one module and one topic and they
appear on the course list.
Exam-Only:
Normally learners are unable to access a course exam until they
complete the course. Use an exam only course when you want to create
a pretest, posttest, practical exercise, survey or other assessment
that the learner can select during login.
Exam-only
course must have exams and exam questions available. If the exam
is for an existing course, set the related exam-only text library
to the same folder as the existing course text folder. This will
make the exams and questions from the existing course available
to the exam-only course.
Instructor-Led:
You may use AcroAdmin to track instructor-led courses and other
learner-centered functions such as qualification requirements. Instructor-led
courses will not appear on the login list. However, you may manually
enter their status using AcroAdmin to provide a central location
for learner records.
Libraries Folder - The libraries folder provides a master folder
to contain subfolders for course exercises, graphics, presentations,
HTML-help files, animations and other media. Normally each course
must have a different text folder. See 'Setting the Libraries Folder'
below for more information.
AUTHORING
TIP - If your course includes a complete module from another course, assign
the same folders as the other course.
For
example, some learners need course modules 1, 2 and 3, and some only need
modules 1 and 2. After adding the full course, add a second course. Assign
the second course the same libraries folders as the first course. Add a module
1 and module 2 to the second course. Also add separate exams for the second
course, if needed. Modules 1 and 2 for both courses will be the same. If you
revise a PowerPoint presentation, add or delete topics or modify questions,
the changes will be effective for both courses.
Importing
a Course
Click 'Import'
and browse to the course you desire to import. You may import a course
that is already part of your installation by giving the course a unique
short title and access code. Manually establish and move files into
folders needed by the imported course.
AUTHORING
TIP: One key reason to import a course is when you have two installations,
one for use by learners and one for course authoring. This permits the course
author to create new courses and revise courses 'off-line.' After testing
the course, import it into the production installation. Using relative libraries
makes importing much easier. Simply copy the unique course folders such as
the Text and Presentations folders to the target installation. Any unique
files such as the course intro and exit html files, if used, must also be
copied to the folder anticipated by the course.
A
second use for import is to quickly configure a new course with settings that
are the same as an existing course. Import the desired course file, and then
edit the settings and parameters that are unique to the new course. If the
new course will share modules with the existing course, then they should have
the same text, presentation and other folders. This gives you a single location
for editing the shared content. If the new course will not share modules,
then the new course must have a separate Text folder and will likely benefit
from a separate Presentations folder.
Deleting
a Course
AcroTrain permits you to displace a course to delete it from the course
listings. When a course is displaced it will not be available in any
program or utility until you recover it. You can recover it by using
the 'Recover displaced course' button after clicking on the 'Add'
a new course button. Recovery will only be available if a course was
previously displaced.
If you
wish to permanently delete a course, Displace the course, then manually
delete the files associated with the course.
WARNING!
Exercise caution when deleting libraries. It is normal for more than one course
to share the same folder and files. For example, if you used separate presentation
and text folders for the displaced course, these folders may be deleted if
no other course uses these folders. However, help, graphics and HTML folders
may not have been used exclusively by the displaced course. Problems associated
with deleting needed files include error messages when learners attempt to
load courses, no presentations run, no questions available for exams, improper
screen appearance and failure of the program to run. Also, if you latter recover
the displaced course, you will have to manually replace all needed files.
Recovering
a Course
To recover
previously displaced courses use the 'Recover displaced course' button
after clicking the 'Add' a new course button at the Course authoring
level. Also manually replace any required course files if they were
moved or deleted.
Modifying
the Course Settings
The AcroTrain
system provides numerous course settings to optimize the learning experience.
To modify course settings, start at the course authoring level. Click
on the course that you wish to modify, and it will appear in red text
on the 'Selected course' line. Then click on the 'Course Settings' button.
Directory setting is required for each course. AcroTrain uses default
values for the other optional course settings. Appendix A lists program
settings and their defaults values. The basic program settings are illustrated
below.

Click on the 'Advanced' button to change several course settings including
instructor mode, audit mode, no objectives, certificate and copy options:
- Resize the
screen to 800 X 600:
- Cover the
background with black
- Dim the
objectives button
- Help Browser
- Text Color
- Background
Family
- Permit sound
- Permit web
links
- Permit instructor
mode
- Audit mode
- Copy files
to the learner's computer
- Require
an access code to register
- Include
an exam with this course
- Present
an introduction when the course begins
- Certificate
selection
- Certificate
text and appearance
Setting
the Course Directories (Folders)
Click
the 'Directories' button on the Course Settings screen to revise
the course file locations. The terms directory and folder are interchangeable
as used here. The libraries folder contains subfolders for the exercises,
graphics, presentations, animations and other media required to
properly run your course. You may use the same folder for more than
one course. However, a change to any file will change the file for
all courses sharing that file.
Use the
'Browse' button to designate a specific path or network location
for the library folder, or click the 'Relative' check box to set
the libraries folder or subfolders relative to your program parent
folder. Using a relative location increases your flexibility to
move the entire AcroTrain base folder and subfolders from a development
site to a production site without changing file designations. Using
relative folders is required if you wish to run your course directly
from a CD-ROM or use the Client-Host feature.
The Text,
Graphics, Presentations, HTML and Help directories may be set independent
of each other. By making these library subfolders independent, each
course will have different presentations, graphics, HTML files etc.
If you have courses that need to share presentations, graphics,
HTML files etc., then they will need to use the same folder for
the shared content.
AcroTrain
relies on files in the Graphics, Help and HTML folders to present
the courses and exams. If you designate a different location for
these folders, copy the files from the original folders to the corresponding
folders. You may revise many files in those folders and add files
to those folders to customize your course appearance. The Presentations
and Text folders normally contain course specific files. The Text
folder must be unique for each course unless you plan to share complete
modules with more than one course.
The default
course file designation assumes the course will only share help
and graphics files with other courses. The Presentation, Text and
HTML folders will be set as subfolders to a folder that uses the
course short name. Since all course must have an HTML file that
runs when learners exit courses, AcroEdit will offer the option
to copy the default HTML files from the HTML folder directly beneath
the Libraries folder. The files that get copied are: exit.html,
intro.html, ctobj.html, acro_powered.swf, gettingthemost.htm and
intro.avi from the HTML folder and macromedialogo.jpg and atlogo.gif
from the Images subfolder.
Directory
structure example:
- AcroTrain
Folder(<FileLocation>)
- -
Libraries Folder(<FileLocation>Libraries)
- -
Graphics Folder with background and other graphics
for all courses (<LibrariesDir>Graphics)
- -
Help Folder with instructions and AcroHelp for all
courses (<LibrariesDir>Help)
- -
HTML folder with default HTML files (<LibrariesDir>HTML)
- -
Course1 Folder (<LibrariesDir>Course1)
- -
Presentations Folder for Course1 (<LibrariesDir>Course1\Presentations)
- -
Text Folder for Course1 (<LibrariesDir>Course1\Text)
- -
Exams Folder for Course1 (<LibrariesDir>Course1\Text\Exams)
- -
HTML Folder for Course1 (<LibrariesDir>Course1\HTML)
- -
Courses2A and 2C Folder (<LibrariesDir>Course2A)
- -
Presentations Folder for Courses2A, 2B and 2C
(<LibrariesDir>Course2A\Presentations)
- -
Text Folder for Courses2A and 2C (<LibrariesDir>Course\Text)
- -
Exams Folder for Course 2A and 2C (<LibrariesDir>Course\Text\Exams)
- -
HTML Folder for Courses 2A, 2B and 2C (<LibrariesDir>Course\HTML)
- -
Course2B Folder (<LibrariesDir>Course2B)
- -
Text Folder for Course2B (<LibrariesDir>Course2B\Text)
- -
Exams Folder for Course2B (<LibrariesDir>Course2B\Text\Exams)
In
this example all courses share the same background graphics and
other standard AcroTrain graphics. Since AcroTrain uses fixed
graphic file names, all courses with the same Graphics folder
and the same background family setting will use the same graphics.
Most users use this approach and the default background setting.
All
courses in the above example also share the Help folder. This
means that they can share the same help files or the folder may
contain different files for different courses. Help files are
needed for giving learners instructions on navigating through
the AcroTrain System. These files are usually the same for all
courses. Your course may have extensive content sensitive help
files. These files are accessed with the AcroHelp button. If your
course has extensive AcroHelp files, you may prefer to have a
separate Help folder for such courses. You will need to include
the instructions as well as the AcroHelp files in the course specific
Help Folder.
Course
1 is a stand-along course that has its own Presentations, Text,
Exam and HTML 'content' folders. Courses 2A and 2B share their
content folders. This works when you have a course with multiple
modules and associated topics. The topic files are stored in the
Text folder. If Course 2A can use all the modules while Course
2C can use only the first few modules the two courses can share
all their directories. With this arrangement, all content changes
made for Course 2A also are changed for Course 2C. With Course
2B, the PowerPoint presentations and HTML files may be shared,
but the modules and topics with the formative and exam questions
are independent of the other courses.
The
Exam subfolder shown above will be created by AcroAdmin when you
create the first exam for your course.

Course
Directory (Folder) Settings
Clicking
Browse permits you to manually edit the designated directory
by typing directly or to search for the desired folder. If you
enter a folder that does not exists, AcroEdit will offer to create
the folder when you click Apply or OK. If you enter a path that
includes the Libraries directory path or the path to the AcroTrain
folder, then click relative, AcroEdit will convert the applicable
path information to '<LibrariesDir>' or '<FileLocation>.'
Click
Relative to convert the entered directory path to a relative
path designation. If the path is not a valid relative path, you
will receive a notice. '<FileLocation>' is the complete
path from the computer drive through the AcroTrain root directory.
The AcroTrain root directory is the directory where AcroTrain.exe,
Login.exe and other files are found. The default name is AcroTrain,
but in your installation it may have been given a different name.
'<LibrariesDir>' is the '<FileLocation>' path plus
the additional folder shown for the Libraries directory.
Clicking
OK starts limited error checks on the designated directories,
saves the directories in the course '.ini' file and returns to
the Course Settings page.
Clicking
Cancel returns to the Course Settings page without saving
the changes.
Click
Apply to implement the same processes as OK, but to return
to this Course Directory (Folder) Setting page.
Clicking
Default enters the default directories for all directories
and sets relative on for all directories.
AUTHORING
TIP - Using relative course folders.
The
suggested folder arrangement is to use the default common locations for the
'Graphics' and 'HTML' folders. These folders typically do not change from
one course to another. For each course, you can establish a subfolder under
the libraries folder. Then, in each course folder, copy the default 'Help'
folder, and create new 'Presentations' and 'Text' folders. Or, use the default
button if you are satisfied using the course short name as the course subfolder
name and AcroEdit will create the folders when you save the data.
For
your course settings, designate the libraries folder as relative. Then designate
the other folders relative to the libraries folder. Type '<LibrariesDir>'
at the Course Directory (Folder) screen to indicate the complete path to the
libraries folder. Type '<FileLocation>' to indicate the root folder
for the AcroTrain installation. Although not recommended, you may type '..\'
to indicate a move to one folder above the present location. Deselect the
relative button to enter your relative path information. AcroEdit with retain
your designated relative path and change the designation back to relative
after you save the directory settings.
When
all directories are relative, this permits you to move or copy a complete
installation to a different location without changing course directory settings.
When you copy over a network or from a CD-ROM, the copy process may change
the file attribute setting to 'Read Only.' Manually change the attributes
of such files when your need to revise or write to the files.
If
you change course directories after saving course content files, you must
manually move the content files to the new location.
IF
you designate directories that do not exist, AcroTrain will prompt you to
verify that you would like to create the directory.
Click
here for more information about the course directories
Course
Access Code
Use
Access Code
Each course
must have a unique access code. The access code may be changed. If
you wish to let the learner access this course without entering this
code, then deselect the 'Use Access Code' option. Select the 'Use
access code' button to require learners to enter the course access
code when they launch the course. The access code is limited to a
four character combination of letters and numbers.
Hidden
Course
Check this
box to prevent this course from apearing in the list of unregistered
courses. Use hidden courses for situations where displaying the course
name could be confusing for some learners or when the course is needed
to make an assessment available, but the course is not intended to
be taken as a stand-alone course. Post course surveys are an example
of such a course.
If learners
need to register for a hidden course, they can click in the course
access code area on the Login course listing screen, then enter the
course access code.
Course
Revision Number
Enter the
optional course revision number. It may be up to eight characters
long. The default revision number is 0.
Completion
Certificate
Set this
on to permit AcroTrain to present a course completion certificate
to learners. See the 'Advanced Course Setting' description for addition
course completion certificate options.
Resize
Screen
With this
option set on, the course will run full screen. Running AcroTrain
full screen helps keep the learner's focus on the training. If this
option is not checked, the training will run in the center of the
learner's screen.
If the
screen is set to a resolution less than 800 X 600, portions of the
training will not be available to the learner or the program may not
function properly. AcroTrain resets the learner's screen to its original
setting when learners exit normally.
NOTE: If
learners use Alt-F4 or Task Manager to exit, or if they experience
a system crash, they will have to manually resize their screen display
setting.
Exam-only
Course
As mentioned
in the 'Adding a New Course' section above, AcroTrain run courses
may be regular or exam only courses. The exam only function allows
you to administer exams and assessments to learners without requiring
them to complete a course. If you have an existing course with content,
you can convert that course to an exam only course. The learner, however,
will be only given the option to 'Take Exams' when selecting this
course during login. Select this setting to convert a regular course
to an exam-only course.
Cover
the Desktop with Black
The learner's
desktop can flash momentarily when AcroTrain transitions between the
PowerPoint presentations and other program features. The 'Cover the
desktop with black' function launches a black cover to prevent this.
If your learner's computer system experiences lack of processor memory
or slow running problems, try deselecting this feature.
Use
Introduction Screen and Intro File:
You may
customize the introduction screen(s) that learners see at run-time
each time they launch the course. AcroTrain uses an HTML file to display
the contents of the opening screen. You may modify the default 'intro
HTML' file found in the HTML folder or create a new HTML file to use
as the course introduction. You may have a media rich introduction
to get your learners interested and motivated for their learning experience.
This function is not available for exam only courses.
To change
the introduction page:
- Modify
or create a new HTML file with your custom information and media
and save it in the HTML folder. You will have to use an HTML or
text editor that can export or save files in HTML format
- From
the AcroEdit Course Settings screen, select 'Use introduction screen.'
- Click
the 'Intro File' button to launch a directory browser.
- Go to
the HTML folder, select your course introduction file and then click
OK.
AUTHORING
TIP - You can put in as many hyperlinked pages as you wish the learners
to view during the course introduction. You only have to identify the opening
page using the instructions listed above.
Most
HTML files used with AcroTrain must have the file extension '.html.' The shorter
'.htm' extension may not function in all instances.
Exit
File:
You may
customize the exit screen(s) that learners see at run-time when they
exit from the course. This file functions the same as the Intro File.
To change the file, click the 'Exit File' button from the Course Settings
screen.
Use
Sound
You can
either allow the use of sound during the introduction HTML and other
HTML sequences or turn it off. This setting impacts the HTML files
only, not the presentation files. If you wish to turn off the sound
in the presentations, modify the PowerPoint presentation files.
Hide
Task Bar
Many learners
may have the Windows taskbar open at the bottom of their screen. This
can at times cover the lower portion of the AcroTrain screen. Check
this to give a hide command when AcroTrain launches.
Use
Review Mode
The AcroTrain
review mode option uses learner progress information to diagnose potential
learner deficiencies and recommends further instruction. Specifically,
the program tracks the exercises that the learner answers incorrectly
on the first try. It then adds the exercises on that topic to a review
list for the learner to review after the instruction modules but before
the exam.
During
the review, AcroTrain presents a list of exercises (topics & objectives)
that the learner should review. The program recommends that the learner
review both the presentations and AcroHelp for each topic on the review
list before retrying the exercises. If the learner answers all exercises
correct on the first try, nothing is added to the review list. If
the course setting includes a review module, learners must complete
the review module to receive course completion credit.
Since the
learner information is recorded, including how they complete the review
module, this is a useful tool for diagnosing and correcting potential
instructional design problems with the program, the content and the
formative testing. Having tools like this available will help pinpoint
learning deficiencies.
Deselect
this option to permit learners to go directly to the course completion
screen after completing the course modules.
Hide
Flow Options
Permit
learners to control their approach to learning the course material
with the flow control options remaining visible at run time. Although
the 'conventional' approach is to present the course content, then
to ask formative questions some learners may prefer to see the formative
question(s) first, then they can go to the presentation if needed.
Instruct learners to de-select 'View Presentations' to be taken to
the course formative questions instead of being taken to the presentation
first. They can click the presentations button at the formative question
screen to view the presentation.
Check the
'Hide flow options' box and the course flow options as shown below
will not be available to learners at run time.
Use
Instruction Boxes
Instruction
boxes appear directing learners on the module and topic menu screens.
Deselect this check box to prevent the instruction boxes.
Use
Program Internal Help or Open Help in Browser Always
During
program run time, you may either display the on-line help information
in a browser window within the program, or you can use the learner's
web browser. The external browser may be kept open and minimized for
quick reference. The internal browser will have to be reopened each
time the learner needs the information. Regardless of this setting,
AcroTrain must use the external browser window during the presentations.
Show
Objectives
Control
module and topic objective presentations with this setting. With all
settings, learners may click the Objectives buttons to review the
objectives.
- Always:
- Module
objectives are presented before each module and topic objectives
presented before each topic presentation and before topic exercises
with this setting. Use this setting if learners will normally
go the the topic exercises before viewing the presentation.
- Never:
- No
objectives are automatically presented.
- Before
presentations:
- Module
objectives are presented before each module, and topic objectives
are presented before each topic presentation with this setting.
- Before
exercises:
- Module
objectives are presented before each module, and topic objectives
are presented before topic exercises with this setting.
If your
course has no objectives you may make the objectives button inactive
using the Advanced Settings.
Light
Text and Dark Text Options
Since the
background colors can be changed from a dark color scheme to a light
color scheme, so can the text that appears on the backgrounds. If
you shift to the light blue background family, use the 'Dark text'
option so that the learner interface remains functional.
Include
an Assessment with this Course
Check this
box to have AcroTrain route learners to an assessment after they complete
the course modules. If checked, learners will not be presented a completion
certificate until they successfully complete the assessment. Select
a particular assessment to have learners routed to the assessment
and to bypass the assessment access code entry. If there is no selected
assessment, give learners, or the assessment proctor, the access code
for the desired assessment.
Include
a Survey with this Course
Check this
box to have AcroTrain route learners directly to a course survey following
the course completion. Selecting a survey is a two-step process: select
the course with the desired survey questions and then select the assessment.
This permits you to use one survey course with one or more survey
instruments for all courses. If you wish to have learners take an
exam before they complete a survey, leave this box unchecked and use
a compound assessment. See the added discussion on surveys and compound
assessments with the Assessment discussion.
Use
Web Help
If clicked,
AcroTrain will look to the designated web location for the AcroHelp
files. Enter the URL to the root web folder where you've located the
AcroHelp files.
OK
Button
Click the
'OK' button to save your changes and return to the main Course Authoring
Level screen.
Modules
Button
Click 'Modules'
to save changes and go to the Modules Authoring Level.
Cancel
Button
Click the
'Cancel' button to return to the main Course Authoring Level screen
without saving your changes.
Defaults
Button
Click this
button to reset the following course settings:
- Resize
screen to checked
- Use
introduction screen to checked
- Use
review mode to checked
- Cover
the desktop with black to checked
- Use
program internal help to checked
- Open
help in browser always to unchecked
- Light
text to checked
- Dark
text to unchecked
- Use
access code to checked
Background
AcroTrain
comes with two background families for different course appearances.
The default background family is a dark color scheme and the 'Light
blue' family is a light color scheme. Click on the 'Setup Background'
button to choose the desired course background family.
AUTHORING
TIP - The default background files location is …Libraries\Graphics
\Backgrounds\Default. The light blue backgrounds are in the lightblue folder.
You may revise one or all of these graphics to create your own background
family. Naturally all courses that have the default background family designated
will experience the change if the files in the default folder change. When
revising files, keep the graphic size and type the same as the original file.
You may create a new subfolder, and then copy the default or lightblue graphics
to the new subfolder. If you then revise the copied files and redirect the
course to your new background family, the default graphics will remain unchanged
for use with other courses.
Intro
File and Exit File
See the
above 'Use Introduction Screen and Intro File' and 'Exit File' discussions.
Name
Click 'Name'
to change the course long title.
AUTHORING
TIP - The course short title is set when you create a course. It cannot
be changed. If you desire a course with a different short title, you could
import the present course, and give the imported version of the course the
desired short title. You could then set the directories to the default settings
and move the folders for the original course to the new locations. If you
then displace the original course, you will have the course with the desired
short title.
Advanced
The advanced
course settings provide additional course settings and repeats many
of the above settings.
Click the
'Advanced' button to open the Course Options dialog box. Click the
tabs to change view, control, general course and certificate related
options. The advanced settings include objective display, instructor
mode, audit mode, copy-to-local and certificates.
View
Options
Resize
the Screen to 800 X 600 Pixels
With
this option set on, the course will run full screen. Running the
CBT full screen helps keep the learner's focus on the CBT. If this
option is not checked, the CBT will run in the center of the learner's
screen. If the screen is set to a resolution less than 800 X 600,
portions of the CBT will not be available to the learner or the
program may not function properly. AcroTrain resets the learner's
screen to its original setting when learners exit normally from
the CBT.
NOTE:
If learners use Alt-F4 or Task Manager to exit or if they experience
a system crash, they will have to manually resize their screen display
setting.
Cover
the Desktop with Black
The learner's
desktop can flash momentarily when AcroTrain transitions between
the PowerPoint presentations and other program features. The 'Cover
the desktop with black' function launches a black 800X600 cover
to prevent this. If your learner's computer system experiences lack
of processor memory or slow running problems, try deselecting this
feature.
Dim
the Objective Button
If a
course has no objectives, set this on to disable the objective button
when your course runs.
Use
the module list Main Menu
The AcroTrain
Main Menu has two options for listing the available course modules:
Two columns of four modules each or a single column list of up to
40 modules. The two-column format is the default. If your course
needs more than eight modules , including the review module, you
must use the single column format.
Help
Browser: Use the Computer's Default Browser or Use the AcroTrain
Browser
During
program run time, you may either display the on-line help information
in a browser window within the program, or you can use the learner's
web browser. The computer's default browser may be kept open and
minimized for quick reference. The AcroTrain browser will have to
be reopened each time the learner needs the information. Regardless
of this setting, AcroTrain uses the computer's default browser window
during the presentations.
Text
Color: Light Colored Text and Dark Colored Text
Since
the background colors can be shifted from a dark color scheme to
a light color scheme, so can the text that appears on the backgrounds.
If you shift to the light blue background family, use the 'Dark
text' option so that the learner interface remains functional.
Background
Family
AcroTrain
comes with two background families for different course appearances.
The default background family is a dark color scheme and the 'Light
blue' family is a light color scheme. Click on the 'Setup Background'
button to choose the desired course background family. Use the drop-down
menu to view available background families.
AUTHORING
TIP - The default background files location
is …Libraries\Graphics\Backgrounds\Default. The light blue backgrounds
are in the lightblue folder. You may revise one or all of these graphics to
create your own background family. Naturally all courses that have the default
background family designated will experience the change if the files in the
default folder change. When revising files, keep the graphic size and type
the same as the original file.
Controls
Options
Permit Sound
You can
either allow the use of sound during the introduction HTML and other
HTML sequences or turn it off. This setting impacts the HTML files
only, not the presentation files. If you wish to turn off the sound
in the presentations, modify the PowerPoint presentation files.
Use
Web Help
If clicked,
AcroTrain will look to the designated web location for the AcroHelp
files. Enter the URL to the root web folder where you've located
the AcroHelp files.
Permit
Instructor Mode
The instructor
mode permits the user to access all course modules and topics without
satisfying the prerequisites. It also has features that help in
situations when using AcroTrain for classroom or group learning.
During instructor mode, AcroTrain suspends data recording.
Set this
feature off if you never plan to use instructor mode. Learners must
enter a key combination and password to enter the instructor mode.
During
course run time, enter the instructor mode from the Main Menu:
Press:
CTRL, ALT, & SHIFT
Enter the password: LAG
You must
leave the Main Menu page for the status change to take effect. In
the instructor mode, AcroTrain stops recording learner data, and
gives temporary credit as if you had completed all the topics as
indicated by the stars on the topic menu.
The instructor
mode also enables two additional question options:
To
show the correct answer, press: ALT & N
To skip the question, press: ALT & S
You
may also answer the question and receive feedback normally.
Audit
Mode
The audit
mode permits users to complete a course or an exam without using
the normal login process. AcroTrain records the learner progress
the same as with a logged in learner. However, most records will
be deleted when the user exits. If the user exits a course or exam
without completing it, partial progress data will be lost.
You may
have AcroTrain warn auditors that they will not receive course completion
credit. AcroTrain will not record course completion credit for auditors
regardless of the notice option you choose.
To launch
AcroTrain in the audit mode, Run the file "AcroTrain.Exe"
with the command line including the desired course name followed
by a space, then a hyphen and another space, then the word audit.
Format:
[AcroTrain Folder]\AcroTrain.exe [Course short title] - audit
For example,
to launch the AcroIntro course from an AcroTrain installation in
your C:\AcroServices\AcroTrain folder, run the following command:
C:\AcroServices\AcroTrain\AcroTrain.exe AcroIntro - audit.
AcroEdit
and AcroAdmin also include buttons to permit developers to launch
courses and exams in the audit mode.
WARNING
- The audit mode is designed for only one learner per course when installed
on a network. This is due to the temporary learner identification assignment
by AcroTrain of '-.' If you must have multiple users auditing the same course
simultaneously, use a short unique number for each user instead of the '-'
in the command line. Ex. '...AcroIntro 1 audit' for auditor 1 and '...AcroIntro
2' audit for auditor 2.
AUTHORING
TIP - Use the audit mode to review courses
and exams without writing learner records and without using Login. Since Login
isn't used, the copy-to-local feature will not function when using the audit
mode. When using AcroEdit or AcroAdmin, course authors are able to launch
their courses directly in the audit mode.
To
create a simple program that you can launch from Windows Explorer with operating
systems supporting batch file. Use Notepad to create a text file with the
launch command. Preceding the command with 'Echo off' will prevent showing
the command on the screen when launching the course. Save the file with the
extension '.bat.'
Echo
off
C:\AcroServices\AcroTrain\AcroFinal.exe Course 999 audit
Another
way to launch to the audit mode is to enter the command after clicking Start
and Run.
Copy
Files to the Learner's Computer
Courses
with large files such as movies that run from PowerPoint slides
may give poor performance if the intranet has limited capability.
AcroTrain can temporarily copy files to the learner's C drive to
avoid such problems. The options are:
- Copy
the executable and presentation files to the local C drive.
- Offer
the learner the option to copy the executable and presentation
files to the local C drive.
- Copy
the executable files to the local C drive.
- Offer
the learner the option to copy the executable files to the local
C drive.
- Copy
the presentation files to the local C drive.
- Offer
the learner the option to copy the presentation files to the local
C drive.
Course
Options
Require
an Access Code to Register
Each
course must have an access code. The access code may be changed.
If you wish to let the learner access this course without entering
this code, then deselect this option.
Include
an Exam with this Course
You may
deselect this button for courses that never incorporate an exam.
This will dim the 'Launch Exam' button on login and when the course
is complete and there is no exam available.
NOTE:
This setting is different than the 'Exam-only' course setting discussed
above.
Present
an Introduction When the Course Begins
You may
customize the introduction screen(s) that learners see at run-time
each time they launch the course. AcroTrain uses an HTML file to
display the contents of the opening screen. You may modify the default
'intro HTML' file found in the HTML folder or create a new HTML
file to use as the course introduction. You may have a media rich
introduction to get your learners interested and motivated for their
learning experience. This function is not available for exam only
courses.
Certificate
Options
AcroTrain
has three certificate presentation options: none, present a certificate
on screen that prints to the learner's default printer or present
a course completion certificate on screen that uses a .rtf file
that the learner can save. Both on screen options permit several
customization options.
If the
course has no exams incorporated with it, AcroTrain presents the
view certificate option at the completion of the course. If the
course has an exam associated with it, AcroTrain presents the certificate
option after the learner passes the exam. Each course can have no
certificate or a different certificate.
Use
the AcroTrain Printable Certificate
This
approach presents the learner's certificate on-screen. They have
the opportunity to print the certificate using their default printer.
To
control the text and text content enter lines and set the font
using the Certificate text and appearance dialog. Sample text
and settings are shown below:
Certificate line no. 4 - Certificate of Achievement
Font - Arial, 45 pt bold, centered
Certificate line no. 8 - Awarded to
Font - Arial, 18 pt. italic, centered
Certificate line no. 10 - ~FullName~
Font - Arial, 36 pt., centered
Certificate line no. 14 - For the successful completion of the
course:
Font - Arial, 18 pt. italic, centered
Certificate line no. 17 - ~CourseName~
Font - Arial, 24 pt., centered
Certificate line no. 20 - On:
Font - Arial, 18 pt. Italic, centered
Certificate line no. 22 - ~Date~
Font - Arial, 18 pt., centered
The default
font is black 14pt Veranda. You may use fonts and attributes that
are available on the computers and printers your learners will use.
WARNING
- Avoid highly decorative and special purpose fonts. They may not be available
on the learner's computer at run time. A font will likely be substituted.
However, spacing and overall certificate appearance may be significantly impacted.
Fonts likely to be available on all learner's computers include Arial, Tahoma,
Veranda and Times New Roman.
Right
justified text is likely to appear differently on different systems. Thoroughly
test certificates using right justification on the computers and printers
to be used by learners.
The top
of each text line is fixed regardless of the font size setting.
Leave lines blank to avoid overlapping text.
Sample
certificate
Keywords
and Edit Comments
AcroTrain
permits several dynamic text substitutions during course run time.
To automatically insert variable data, include the keywords with
the '~' preceding and following exactly as shown. Use the 'Edit
Comments' button to access the comment editing function.
| Key
Word Text |
Resultant
Text |
| ~FullName~ |
Learner's first
and last name |
|
~CourseName~
|
The Course long
title |
| ~AssessmentName~ |
The assessment
name |
| ~Date~ |
The current
date from the learner's computer |
| ~Company~
|
The 'CertCompany='
text from the course '.ini' file |
| ~Comment~ |
The 'CertComment='
text from the course '.ini' file |
| ~Comment2~ |
The 'CertComment2'
text from the course '.ini' file |
The certificate
uses the '.jpg' graphic 'cert-background.jpg' for the certificate
background and border. You may substitute your own 800 X 600 pixel
graphic. All courses using this option share the same background
graphic.
AUTHORING
TIP - AcroTrain permits learners to return to a course assessment and
print a certificate that was lost or failed to print properly. The date used
for certificates is the date set on the learner's computer when the certificate
is printed.
Use
.rtf File
AcroTrain
can open a course completion certificate using an .rtf file. Locate
the .rtf file in the AcroTrain base folder. This is the same folder
that contains the AcroTrain.exe file. Learners may save the rtf
file with the added dynamic text. The file 'cert.rtf' is a generic
certificate file as shown below. Note that the .rtf file may use
the same keywords and dynamic text described above under 'Keywords
and Edit Comments.' The .rtf file must be available when a learner
completes a course. The learner can then print or save the file.
Administrators may edit the sample rich text format (rtf) file to
vary the content and appearance. Graphics are not and some .rtf
features may not be supported. The certificate opens in the word
processor designated for '.rft' files on the learner's computer.
Example:
~Comment~
This
is to certify that on ~Date~
~FullName~
satisfactorily
completed the e-Learning course
~CourseName~
~Company~
~Comment2~
Modules
You can either
double click the course to reach the list of modules or click on a course
once, then click on the 'Modules' button.
AUTHORING
EXAMPLE - Modules are similar to chapters in a book and they relate directly
to a major task that the learner must be able to perform. They call for terminal
performance and consequently, should include an objective calling for terminal
performance. When you put several modules together, you are putting together
the major tasks associated with a job, duty or process.
For
a Mechanic's course the task analysis yielded one job or process, potentially
several duties and several task skills or knowledges. In this case, the duties
of brakes, exhausts, transmission and engine diagnostics became the modules.
If
you are creating separate courses for each duty, you should setup the libraries
as discussed under 'Setting the Libraries Folder' above.
For
example, your course name may be 'Auto Mechanic' and your modules might be
'Introduction to Auto Mechanics' & 'Automobile braking systems' or whatever
may be appropriate for your program.
Add
a Module
Each course
must have at least one module. Click on the 'Add' button to add a module
to the currently selected course. Enter a title for the added module title,
and then press the return key. AcroTrain sets the module parameters to
no prerequisites, no objectives and positioned as the last module. See
modifying a module below to revise module settings.
AcroTrain assigns
each module the next available sequential number. This number assignment
changes when you change the module sequences or delete a module. When
you change module sequence, AcroTrain renumbers the modules to agree with
the new sequence. Displacing or deleting a module will cause all modules
to 'fill in the gap' in module numbers.

HINT
- AcroTrain builds modules 'on-the-fly' at run time. The topics assigned to
the module and objectives will appear when the learner selects the module.
If you add or delete a topic, it will automatically be included or excluded
from the module topic list at run time.
If
you add a topic after a learner completes the module with the added topic,
or if the learner is completing the module when you make the addition, the
learner will have module completion credit. Such learners can receive credit
for completing the course without completing the added topic.
Deleting
a Module
WARNING
- Deleting a module permanently or just displacing it, has a major impact
on courses. Prerequisites and topics relationships must be reestablished.
Course exams will likely require rebuilding, If multiple courses use the same
topic files, these other courses will also require extensive changes. If learners
are partially through a course, they may have to retake the entire course
to achieve an accurate course record.
You have two
options when deleting a module: either delete the module permanently or
displace the module. If you decide to delete a module permanently, you
will not be able to recover it later. When a module is displaced, it will
not be available in any program or utility. You can recover it by using
the 'Recover displaced module' button after clicking on the 'Add' a new
module button.

After deleting a module, you must reestablish prerequisites and topic
relationships.
Use AcroEdit
to reestablish prerequisites. Also check prerequisites for other modules
to verify they agree with the new module assignments.
Topic relationships
may be manually changed using Windows Explorer. The topic files are in
the course text folder. Topics starting with '01' will appear with module
1 etc. If you permanently deleted a module, you may manually delete the
associated topics. After you verify that you have the correct module to
associate with the topic for all courses that use the topic, manually
renumber topics to achieve the desired relationship between topics and
modules. Course exams must be rebuilt following topic renumbering since
the exams record the full topic number.
The learner
records record the module number at the time the learner completes the
module. Learner records for course may give credit for incorrect modules.
Modify
a Module
Click on 'Edit
Module Data' from the main module screen to access the module settings.
To edit the module name, click the 'Title' button or the title text.
- To change
the module position relative to the other course modules, click in the
open space between module titles on the list in the box on the right.
Changing a module position changes the module's dynamically assigned
number. See the important discussion in 'Deleting a Module' above about
the impact of such changes on this and other courses.
- To edit
module prerequisites, click the 'Prerequisites' button or the prerequisite
text. Then click on the available modules in the left box. Selected
prerequisites appear in the box on the right. To deselect a prerequisite,
click in the box on the right to return it to the box on the left. After
making changes, click the 'Done' button to save your changes and return
to the Edit Module Data screen.
- Edit the
module terminal performance objective(s) (TPOs) by clicking on the 'Objectives'
button' or the objectives text. Click in one of the five boxes to add,
edit or delete a TPO. When finished, click the "Done' button to
save your changes and return to the 'Edit Module Data' screen.
Click the 'Continue
to Topics' button after you have setup the module settings. The 'Continue
to Topics' and 'Return' functions save your settings automatically. However,
if you wish to save your settings and exit or go to the course authoring
level, use the 'Save' button first. If you wish abandon your changes,
branch to the beginning of the module or course authoring levels using
the Authoring Levels task bar.
Topics
Just as a chapter
in a book needs sections and pages of information, a module needs topics.
After saving and continuing from the 'Edit Module Data' screen, the 'Topics'
screen shown below appears with a list of available topics. You may select
a topic, delete a topic, edit topic data or add a new topic.

Adding a Topic
Click the 'Add'
button to add a topic to the currently selected module. You will have
to provide a title/name and enter the topic data for your new topic. See
modifying topic characteristics below when setting topic data.
Deleting
a Topic
WARNING
- Deleting a topic permanently or just displacing it, can have a major
impact on courses. Prerequisites relationships must be verified. Course exams
will likely require rebuilding, If multiple courses use the same topic files,
these other courses will also require extensive changes. If learners are partially
through a course, they may have to retake the entire course to achieve an
accurate course record.
You have two
options when deleting a topic. You may either delete the topic permanently
or you may displace the topic for future use. If you decide to delete
a topic permanently, you will not be able to recover it later. When a
topic is displaced, it will not be available in any program or utility
until you recover it. You can recover it by using the 'Recover' button
on the main topic screen.

Modifying Topic Settings
Click on the
'Edit Topic Data' button to modify or edit the topic setting/options The
screen illustrated below will appear.
- To edit
the topic name, click the 'Title' button or the title text.
- To change
the topic position click in the open space between the list of topics
in the box on the right side of the screen.
- To edit
topic prerequisites, click the 'Prereq's' button or the prerequisite
text. Then click the available topics in the left box. When selected
as a prerequisite, the topic moves to the box on the right. To deselect
a topic as a prerequisite, click the topic that you want to deselect
in the box on the right. After changes are made, click the 'Done' button
to save your changes and return to the 'Edit Topic Data' screen.
- Click the
'PowerPoint file' button or in that screen area to launch a directory
viewer. Select a PowerPoint file to use for the topic presentation.
Use the 'Launch PowerPoint' button to launch PowerPoint and edit your
topic presentation. You must save the topic presentation file in the
course 'Presentations' folder.
AUTHORING
TIP - When creating a new topic, save your PowerPoint file with the same
name as the topic. This makes it easier to assure you correctly associate
files.
- Click
the 'AcroHelp file' button or in that screen area to launch a directory
viewer. Select an HTML file to use as the on-line help for the current
topic. Use the 'Launch Help' button to view your designated AcroHelp
file using your default HTML viewer.
AUTHORING
TIP- When creating a new topic, save your HTML file with the same name
as the topic and the PowerPoint files previously created. This makes it easier
to assure you correctly associate files.
Potential
sources for help files include the PowerPoint slide speaker notes, a procedure,
an industry standard or government regulatory guidance document and custom
web pages. Inform your learners of the information available on your PowerPoint
slides.
-
Identify the topic as a 'Topic,' 'Sub-topic' or 'Sub-sub-topic' by clicking
on the appropriate level on the 'Edit Topic Data' screen. This designation
controls the indentation on the topic menu at run time.
- To edit
the topic enabling objectives (EOs), click the 'Objectives' button'
or the objectives text. Click in one of the five boxes to add, edit
or delete an objective. When you are done adding and modifying the objectives,
click the "Done' button to save the data and return to the 'Edit
Topic Data' screen.
AUTHORING
TIP
- These objectives are used to map what the learner must be able to know or
do as a result of completing the topic. When put together with all other EOs
in a given module, the learner should be able to meet the condition, task
and standard outlined in the module TPO.
Click the
'OK' button after you have set the topic settings to save the settings
and continue to the selected topic's Questions page. The 'Apply,' 'Return'
and 'OK' functions save your settings. "Apply' keeps you on the
Edit Topic Data page, and 'Return' returns you to the Edit Moduyle Data
page. Use the 'Cancel' button or Authoring Level taskbar to branch to
a different level without saving.
Questions
After setting
the topic data, click 'OK.' A list of questions and exercises will appear
on the screen for the current topic. Click the 'Formative' or 'Summative'
buttons to select formative questions that appear following the presentation
or exam questions.
Using
the Topic Exercise and Question Editor
When you enter
the question authoring level, a list of the available formative questions
for the topic appears. Click the 'Exam Questions' button to view the topic
exam questions. Click a question once to select it. Click a second time
or click the 'Edit Question' button to edit the question.
Click on the
'Add' button to add a question.
When adding
a new question, you will have to provide a name or title for the question,
make it formative or exam question and select the exercise type (i.e.
multiple choice, matching, true/false, yes/no, or drag and drop etc…).
After you add the question, set the question parameters shown below.
Multiple-Choice
Questions
This guide
will discuss multiple-choice questions in detail. Other question types
share many of the parameters used with multiple-choice questions. The
differences for each question type are discussed below.
At the Question editing
screen you may revise the correct answer, layout, random choice, priority
and relative point value settings. Click the desired correct answer, layout
and random choice. Click and drag the priority and relative point value.
See the chapter on 'Courseware Administration' for detailed information
on creating exams that use the priority when generating random exams.
The default for priority is 10 and relative point value is 1.
Only multiple-choice
and short answer questions have more than one layout style. Layout style1
presents the choice boxes in two columns. Layout style 2 presents the
choices in one column. See below for short answer style information.
If your multiple-choice
question choices must be presented in the 'as entered' sequence, set 'Random
Choices' to 'No.' With 'Random Choices' set to 'Yes,' AcroTrain will present
the choices in a random sequence determined each time the question appears.
Toggle exam
questions between encrypted and unencrypted status with the Toggle Encryption
button.
To edit the question
text fields from the question title through the feedback, click the text
or the button.
AUTHORING
TIP - A learning outcome is very useful in determining the level of cognition
that you expect from the learner. Use this information when creating exams
to determine which questions to select or give priority to for randomly generated
exams.
Question
Feedback
Question
feedback for the correct answer and the incorrect answer will be the
same for many courses. The AcroTrain e-Learning System permits you to
establish two standard feedback statements for each feedback type. Revise
the standard feedback statements, by entering the desired text, then
clicking the arrow next to the text. To use the revised text for the
current question feedback, click the desired standard text. You may
'cut and paste' feedback text from another application. Each feedback
text entry can be up to 2000 characters long. The text scrolls in a
box similar to the box used for editing. However, the editing box does
not scroll. Use your keyboard arrow keys to view off screen text.
AUTHORING
TIP - Keep in mind the question type when editing. Formative questions
can be repeated and exam questions cannot. This means that the exam question's
negative feedback will act the same as the formative question's final feedback.
You may enter final feedback for exam questions; however, it will not be used.
Supplemental
Information
Enter supplemental
information for any question type to make the question or exercise scenario
based. You must select an HTML file for the supplemental information.
To include graphics and detailed text with a question or series of questions,
create an HTML file with the desired data. Then click on the 'Supplemental
Info' button to associate the HTML file with your question. The .html
files must have the full 'html' extension. Some applications save HTML
files with an '.htm' extension. Use Windows explorer to rename such
file with the '.html' extension.
Tries
Limit
The tries
limit settings determines how many times a learner must attempt to answer
a formative question before being offered the option to continue. The
default value used at run time, if this is not set, is '1.' I.e., the
learner can continue following an incorrect answer on the first attempt.
Set this value to 'INF' to prevent learner advancement regardless of
the number of attempts.
AUTHORING
TIP - The general rule for the tries limit is that it should be set as
low as will achieve effective learning. This will minimize learner frustration.
Learner frustration can be very severe when the question had an incorrect
answer designated by the course author, or the learner has a misunderstanding
and continues to give the same incorrect answer. The recommended tries limit
for questions with a binary answer such as true/false and yes/no questions
is '1.' However, if you are using the review file feature, you may want to
set this to '2.' This will force learners to view the review material at least
one time before being permitted to continue. For multiple-choice questions
a tries limit of 2 to no more than the number of choices is recommended. For
short answer questions 2 or 3 is the recommended tries limit. For drag-and-drop
and matching the learners experience negative feedback with the first and
all subsequent incorrect responses. You may wish to use a higher tries limit
for these two question types.
Occasionally
a question may be used for documentation purposes. An example would be if
you had made it clear that learners must do all work on their own, you may
want to ask them to verify that they had done the work on their own. By setting
the tries limit to 'INF,' learners would not be able to continue unless they
gave the correct answer.
Carefully
choose the words used for negative feedback to assure learners understand
what to expect and how to successfully complete the question.
Use
A, B, C ...?
Two backgrounds
are provided for multiple-choice question choices. The default backgrounds
include A, B, C, D and E to clearly label the choices. Click 'No' when
your question needs an unlabeled background.
AUTHORING
TIP - Use the unlabeled choices background when authoring survey questions
that require a ranking response. For such questions you likely will also wish
to click 'No' for Random Choices as well.
Review
File
Formative questions
may include a review file that branches the learner to the desired information
when they incorrectly answer a formative question. The review file may
be the presentation file for the topic, a different PowerPoint file or
any executable file that will run on the learner's computer. Review files
must be located in the course Presentation Folder. Click 'Show Files'
to open the files selection box with the available files listed. All files
in the presentations folder are listed since you may use .html, .avi,
.exe and numerous other file types. Launching a PowerPoint review file
will not rely on any learner programs or settings. Other file types may
not run on all learner computer installations.
If the review file is
a PowerPoint file, it will be displayed using the PowerPoint 2003 viewer.
The will be a full screen display regardless of the course resize screen
setting. You may designate a starting slide for PowerPoint files. If you
have a long PowerPoint file. You may wish to advise learners with the
negative feedback that they can click the Escape key to return to the
question. For other executable files, you may add command line arguments.
Deleting
a Question
You have two options when deleting an exercise. You may either delete
the question permanently or you may displace the question for future use.
If you decide to delete a question permanently, you will not be able to
recover it later. When a question is displaced it will not be available
in any program or utility until you recover it. You can recover it by
using the 'Recover' button after clicking on the 'Add' a new question
button.
WARNING
- Topics questions must remain sequentially numbered. When you delete or displace
a question, AcroTrain renumbers the remaining questions to fill the number
gap. This can change the questions that appear in your exams, if you have
fixed verses randomly generated exams. Also, question analysis will be affected
if some learners have already answered a deleted or renumbered question. Using
AcroAdmin, you can generate a course question report for the course before
changes. Then use date filtering to generate a separate report for analysis
following the question deletion.
Changing
a Question Type
A Change Type button appears when you select an existing question. This
may have the most use when importing questions that have no question type
designated. Using the above chart, note that only those parameters that
are common to both question types will be useable following conversion.
Use AcroEdit to add needed parameters to your converted questions.
AUTHORING
TIPS - AcroTrain run time responses to incomplete question data:
If
the question field is blank, AcroTrain normally will skip the question at
run time.
True/False
and Yes/No Questions
True/False
and Yes/No questions function like multiple-choice questions for shared
parameters. The only difference is the correct answer indication is a
True/False or Yes/No switch instead of a check box.
Short
Answer Questions
Short answer
questions function like multiple-choice questions for shared parameters.
The short answer correct answer permits several variations on the correct
answer. Different acceptable correct answers are separated by commas.
To accept misspelled
entries use the match percent scale. The percentage numbers are only to
permit you to repeat the setting, the matching algorithm uses the relative
value to accept only slight variations when set near 100% and to accept
nearly any response when set near 0%. In addition, if the match percent
is set to any value below 100%, some common misspellings such as 'y' for
'i' and 'ist' for 'est' will be applied to your correct answers when judging
the learner response.
For short answer
questions layout style 1 limits the learner's response to 30 characters
and evaluates the response against the the correct answer. Short answer
layout style 2 permits up to 2000 character responses, but does no evaluation.
Style 2 is intended for use with surveyS and assessments that collect
data.
Drag
and Drop Questions
Drag and Drop
questions function like multiple-choice questions for the common parameters.
Instead of choices, you will designate statements that appear on the left
side that can be dragged to fixed positions on the right side.
With formative
questions, learners will receive feedback after each attempt. For exam
questions, learners must drag all statements to the desired positions,
then click 'Submit.' Before clicking 'Submit' learners may clear there
choices without being penalized with an incorrect answer.
AUTHORING
TIPS - AcroTrain run time responses to incomplete question data:
With
drag and drop or matching questions, AcroTrain will ignore left side text
fields that follow an empty field. Ex. If you have three items, they must
be in fields 1, 2 and 3. Although the right fields may include empty fields,
the total number of right fields used may not exceed the number of fields
on the left. In the three left fields example, the right fields with data
could be fields 1 and 3. However, if there is a right field four and no left
field 4 the right field 4 target will not function. If you include more correct
answers then left fields with data, the excessive correct answer data will
be ignored at run time.
Include
drag and drop and matching questions with your courses when the format efficiently
measures the desired data. Also, use them for variety. They are particularly
appealing to learners with a 'hands-on' learning style.
Matching
Questions
Matching questions
function like drag and drop questions except the right side and left side
text is fixed and learners draw a line connecting the boxes to indicate
the match.
Adding
Question Keywords
AcroTrain question keywords
permit custom assessments that utilize the keywords to develop custom
reports that can give learners feedback based on their answers to related
questions.
After selecting an exam
question, the keyword button becomes active. Each keyword must be separated
by a comma. If you enter spaces, AcroTrain will remove the spaces. For
example, if you enter 'word 1, word 2' The recorded keywords will be 'word1'
and 'word2.'
Import
Questions from Another Topic File or a Text File
Questions may
be imported from other topics or external test files. When importing from
another topic the AcroTrain required format will already exist. However,
when importing from an external text file, format requirements must be
met. The six different question types collectively have over 60 question
parameters such as question title, question text, correct answer, positive
feedback and revision number. No question type has all the parameters,
and many parameters are optional. Each parameter has a unique keyword
used to identify the parameter. The AcroTrain Question Parameters, Keywords
and Types table shown below identify question parameter keywords and their
use with the different question types.
To import questions
from a topic file, click the Import button from the question list menu
and then browse to the desired topic file. When importing questions from
an external file, follow the same procedure to locate the desired file.
The files for
importing questions must have the .txt file extension. From word processors
such as Word or Word Perfect, use the 'save as' feature to save question
files as .txt files. Saving a file as a .txt file removes special formatting
features such as font, color, size, indents etc. AcroEdit sets these features
at run time. When browsing to select a file, only text files will appear.
The minimum
requirement to define a question are a question section title in the format
'[FormQuestionxx]' and text following the 'QuestionText=' keyword. (For
Windows .ini file experts we recognize that the = sign is technically
not part of the keyword. We will include it with the keyword to show the
entire character set that must be used to indicate a question parameter.)
Sample minimum
entry for a question:
[FormQuestion05]
QuestionText=X
AcroEdit would
accept the above question since it meets the minimum requirements. Naturally,
you would have to edit the question before using it in a course. However,
the above data would hold a question position. Note that other question
parameters are highly recommended. The question title is particularly
important since the title appears when listing questions available for
editing or importing into other topics.
The section
title is very critical to successful question importing. It must always
appear; it must be either 'ExamQuestion' or 'FormQuestion' followed by
a unique two-digit number; and it must be enclosed in square brackets,
[ ]. If more than one question has the same section title, AcroEdit will
only import the first question. An exam and a formative question may have
the same number, but two exam questions must have different numbers. Include
leading 0's for numbers 1 through 9. The lowest recognized number is '01,'
and '99' is the highest. The numbers in question source files do not have
to be in sequence, and gaps in the numbering sequence are permitted. AcroEdit
will renumber questions to be in sequence and without gaps when you import
them.
When editing
questions in a word processor, we suggest entering the following data
for multiple-choice questions.
[Exam(or Form)Questionxx]
QuestionTitle=
QuestionText=
QuestionType=MC
Objective=
LearningOutcome=
LayoutStyle=
QuestionPriority=
RelativePointValue=
ChoiceA=
ChoiceB=
ChoiceC=
ChoiceD=
ChoiceE=
CorrectAnswer=
PosFeedback=
NegFeedback=
FinalFeedbabk=
HintText=
MoreText=
You may use
the above format and complete just those parameters that you wish to include
with your question. AcroEdit will ignore keywords that have no data. Also,
AcroEdit will ignore your data if the first character following a keyword
equal sign is a space. Spaces are permitted for text entries such as questions
and choices. However codes such as ''MC,' 'KT' and the words that are
acceptable answers for short answer questions must be entered without
spaces.
Use the table
and keyword listing below to develop similar standard formats for other
question types.
AUTHORING
HINTS -To convert existing questions you may find it easier to use a 'find
and replace' approach instead of pasting the data into the keyword template.
For example, use the 'find and replace' feature to replace 'A.(Tab)' with
'ChoiceA=.' After you import the questions, use AcroEdit to add the additional
data. When
importing questions you may exceed the recommended topic question size. To
avoid this, limit total imported question count and total data for each question.
See the corrupted question file detection section for additional information.

Corrupted
Question File Detection and Warnings When Recommended Question Counts
Could be Exceeded
Selected AcroTrain functions have a file size limit. AcroEdit may permit
up to 99 formative and 99 exam questions per topic. However, we recommend
10 relatively long questions or 20 short combined formative and exam questions
per topic. When you enter the question selection page, AcroEdit will give
a warning if the selected topic file size exceeds 22000 bytes. The recommend
maximum file size is 27000 bytes. Each question character adds approximately
one byte to the file size.
Warnings also
appear when deleting a file. AcroEdit must renumber questions to avoid
question number gaps. When the file size gets too large, AcroEdit is unable
to perform this operation properly. File corruption may result. Although
there are several warnings, you may still exceed the recommended question
count limits. If you find you have corrupted your file, see the discussion
below on manually checking and editing questions.
|
AcroTrain
Question Parameters, Keywords and Types
|
|
Parameter
Keyword
|
MC
|
TF
|
YN
|
SA
|
DD
|
MA
|
Comment
|
|
QuestionTitle=
|
O
|
O
|
O
|
O
|
O
|
O
|
Highly
recommended
|
|
QuestionText=
|
R
|
R
|
R
|
R
|
R
|
R
|
Required
|
|
QuestionType=
|
D
|
|
|
|
|
|
1
or MC (Enter the number or 2-character upper-case abbreviation.)
|
|
|
O |
|
|
|
|
2
or TF
|
|
|
|
O |
|
|
|
3
or YN
|
|
|
|
|
O |
|
|
4
or SA
|
|
|
|
|
|
O |
|
5
or DD
|
|
|
|
|
|
|
O |
6
or MA
|
|
Objective=
|
O
|
O
|
O
|
O
|
O
|
O
|
For
future use
|
|
LearningOutcome=
|
O
|
|
|
|
|
|
KT
Knows terms (Enter KT)
|
|
|
O |
|
|
|
|
KF
Knows Facts
|
|
|
|
O |
|
|
|
KP
Knows Procedures
|
|
|
|
|
O |
|
|
AP
Applies Principles
|
|
|
|
|
|
O |
|
CP
Comprehends Principles
|
|
|
|
|
|
|
O |
Other
|
|
LayoutStyle=
|
D
|
|
|
|
|
|
1
Checkerboard choices
|
|
O |
|
|
|
|
|
2
Stacked choices
|
|
QuestionPriority=
|
O
|
O
|
O
|
O
|
O
|
O
|
0
10 (10 is default value)
|
|
RelativePointValue=
|
R
|
R
|
R
|
R
|
R
|
R
|
0
10 (1 is default value)
|
|
ChoiceA=
|
R
|
|
|
|
|
|
|
|
ChoiceB=
|
R
|
|
|
|
|
|
|
|
ChoiceC=
|
R
|
|
|
|
|
|
|
|
ChoiceD=
|
O
|
|
|
|
|
|
|
|
ChoiceE=
|
O
|
|
|
|
|
|
|
|
CorrectAnswer=
|
R
|
R
|
R
|
R
|
|
|
A,
B, C, D, or E for MC | T or F for TF | Y or N for YN | short answer
words separated by commas for SA
|
|
PosFeedback=
|
O
|
O
|
O
|
O
|
O
|
O
|
Learners
may receive errors if blank
|
|
NegFeedback=
|
O
|
O
|
O
|
O
|
O
|
O
|
Learners
may receive errors if blank
|
|
FinalFeedbabk=
|
O
|
O
|
O
|
O
|
O
|
O
|
Learners
may receive errors if blank
|
|
HintText=
|
O
|
O
|
O
|
O
|
O
|
O
|
|
|
MoreText=
|
O
|
O
|
O
|
O
|
O
|
O
|
|
|
RevisionNum=
|
O
|
O
|
O
|
O
|
O
|
O
|
|
|
RevisionDate=
|
O
|
O
|
O
|
O
|
O
|
O
|
|
|
RevisionTime=
|
O
|
O
|
O
|
O
|
O
|
O
|
|
|
RevisionBy=
|
O
|
O
|
O
|
O
|
O
|
O
|
|
|
RevisionComment=
|
O
|
O
|
O
|
O
|
O
|
O
|
|
|
Encrypted=
|
D
|
D
|
D
|
D
|
D
|
D
|
No
0
|
|
|
O
|
O
|
O
|
O
|
O
|
O
|
Yes
1 This value must be set using AcroEdit.
|
|
MatchPercent=
|
|
|
|
|
|
R |
Whole
number 1 100
|
|
ObjectA=
|
|
|
|
|
R |
|
|
|
ObjectB=
|
|
|
|
|
R |
|
|
|
ObjectC=
|
|
|
|
|
O |
|
Required
if Position3 or 4 used
|
|
ObjectD=
|
|
|
|
|
O |
|
Required
if Position4 used
|
|
Position1=
|
|
|
|
|
O |
|
At
least two Positions required
|
|
Position2=
|
|
|
|
|
O |
|
At
least two Positions required
|
|
Position3=
|
|
|
|
|
O |
|
At
least two Positions required
|
|
Position4=
|
|
|
|
|
O |
|
At
least two Positions required
|
|
CorrectAnswerA=
|
|
|
|
|
R |
|
|
|
CorrectAnswerB=
|
|
|
|
|
R |
|
|
|
CorrectAnswerC=
|
|
|
|
|
O |
|
Required
if ObjectC used
|
|
CorrectAnswerD=
|
|
|
|
|
O |
|
Required
if ObjectD used
|
|
Left_text1=
|
|
|
|
|
|
R |
|
|
Left_text2=
|
|
|
|
|
|
R |
|
|
Left_text3=
|
|
|
|
|
|
O |
Required
if Right_Text3 or 4 used
|
|
Left_text4=
|
|
|
|
|
|
O |
Required
if Right_Text4 used
|
|
Right_text1=
|
|
|
|
|
|
O |
At
least two Right_Text required
|
|
Right_text2=
|
|
|
|
|
|
O |
At
least two Right_Text required
|
|
Right_text3=
|
|
|
|
|
|
O |
At
least two Right_Text required
|
|
Right_text4=
|
|
|
|
|
|
O |
At
least two Right_Text required
|
|
Ans_left1=
|
|
|
|
|
|
R |
|
|
Ans_left2=
|
|
|
|
|
|
R |
|
|
Ans_left3=
|
|
|
|
|
|
O |
Required
if Left_Text3 used
|
|
Ans_left4=
|
|
|
|
|
|
O |
Required
if Left_Text4 used
|
|
IEFile=
|
O
|
O
|
O
|
O
|
O
|
O
|
Question
supplemental .html file
|
|
IEAnchor=
|
O
|
O
|
O
|
O
|
O
|
O
|
Supplemental
.html file anchor identifier
|
|
IEOption=
|
D
|
D
|
D
|
D
|
D
|
D
|
0
Not used
|
|
|
O
|
O
|
O
|
O
|
O
|
O
|
1
Used
|
|
IEText=
|
D
|
D
|
D
|
D
|
D
|
D
|
Learner
instructions Default text is Click here for supplemental information!
|
|
Random=
|
O
|
|
|
|
|
|
0
No
|
|
|
D
|
|
|
|
|
|
1
Yes
|
Legend
and notes:
R - Required
data. You must add this data using AcroEdit or include it with the
imported question data.
D - Default value. If not designated AcroTrain may use this value
as the default value. Avoid reliance on defaults.
O - Optional data
Question
Types:
MC - Multiple
Choice TF - True or False YN - Yes or No
SA - Short Answer DD - Drag and Drop MA - Matching
The
'Comment' column indicates the data. Codes must be entered exactly as
shown. The descriptors following the hyphens must not be included. For
Example, enter just the two upper-case letters 'KT' for LearningOutcome
'Knows Facts.'
The QuestionType data may be either the single numeric digit or the two-letter
designation. AcroEdit may change the QuestionType letter designation to
the numeric designation.
Some default values function only after editing an imported question.
Initial encryption status must be omitted or 0. Change the encryption
status using AcroEdit.
Limit all parameters to one paragraph.
Copy and paste
this complete question parameter list into your word processor or text
editing program, and then edit it to create a custom question template.
Question Parameters:
QuestionTitle=
QuestionText=
QuestionType=
Objective=
LearningOutcome=
LayoutStyle=
QuestionPriority=
RelativePointValue=
ChoiceA=
ChoiceB=
ChoiceC=
ChoiceD=
ChoiceE=
CorrectAnswer=
PosFeedback=
NegFeedback=
FinalFeedbabk=
HintText=
MoreText=
RevisionNum=
RevisionDate=
RevisionTime=
RevisionBy=
RevisionComment=
Encrypted=
MatchPercent=
ObjectA=
ObjectB=
ObjectC=
ObjectD=
Position1=
Position2=
Position3=
Position4=
CorrectAnswerA=
CorrectAnswerB=
CorrectAnswerC=
CorrectAnswerD=
Left_text1=
Left_text2=
Left_text3=
Left_text4=
Right_text1=
Right_text2=
Right_text3=
Right_text4=
Ans_left1=
Ans_left2=
Ans_left3=
Ans_left4=
IEFile=
IEAnchor=
IEOption=
IEText=
Random=
Authoring
survey questions
The major differences
between survey questions and other AcroTrain questions are the information
recorded for surveys, the question feedback and the recommended format
when authoring questions. AcroTrain surveys will record all question type
responses except drag and drop and matching questions.
Survey questions
may be authored for 'Exam Only' courses and regular courses. If you wish
to have several courses use the same questionnaire or you wish to administer
questionnaires, use an 'Exam-Only' course. Survey questions must be authored
as exam questions to receive the reporting and feedback suppression features
reserved for surveys.
- Drag and
drop and matching question results will not be recorded. Avoid these
question types.
- Question
feedback will not be used even if entered for the survey question.
- For short
answer questions, use layout style 2. This style permits learners to
enter up to 2,000 characters or approximately one page in response to
the question versus the 30-character limit with layout style 1.
- Survey reports
are developed only for exam questions. Formative survey questions may
be used with a course, but the survey responses will be merged with
the responses to other formative questions.
- Multiple-choice
survey questions that ask responders for a ranking should have 'Random
Choices?' set to 'No,' and 'Layout' set to '2.' Layout style 2 will
list the choices from choice 1 down to the last choice. The survey report
for multiple-choice questions will report the choice responder's choice
with '1' being the top choice and the number of choices available. The
report will also include the question and the full text for the responder's
choice.
- You may
enter additional question data such as the correct answer. However,
AcroTrain will ignore such information.
- Note that
learners cannot skip questions as they might do with a paper survey
instrument. If you need a 'Not Applicable' option, use the multiple-choice
format and include it as one of your choices. For example, if you ask
a 'Yes/No' question, use three choices: 'Yes,' 'No' and 'Not Applicable.'
NOTE: If you plan to use the survey only following other courses or exams,
you may keep the course off the available courses list that learners see
when they log in and register for courses. Use AcroEdit to check the course
setting, 'Hidden Course,' to accomplish this. Learners can access hidden
courses by entering the course access code should you have occasional
need to launch the survey from the Login menu.
Manually
Checking and Editing Topic Files
The AcroTrain
course and topic files are Windows .ini files. The course file is in the
AcroTrain root folder and has the .ini extension. The topic files are
in the designated course text folder location, and they have a '.txt'
extension. (In Windows Explorer you may have to change your options to
view the file extensions. Select tools > Folder Options… >
View > Uncheck 'Hide file extensions for known file types.')
Typically double-clicking
the '.ini' and '.txt' files will open them for editing in Notepad. This
is the recommended file editing program. If the files open in another
program such as Word, you must always save the file as a text file and
you must verify that the program does not change or add to the file extension.
WARNING: Editing
topic files may produce unexpected results. A error in just one character
can produce fatal errors. Always make a backup before editing a file and
test your course thoroughly after editing files. Also, AcroEdit includes
error checking for some data entries and provides guidance on character
limits. Naturally these functions are not available if you manually edit
a Topic file. We recommend you limit manual editing to situations that
cannot be corrected with AcroEdit such as corrupted files.
Ini file sections are designated by section titles enclosed in [ ] brackets.
Note that the [TopicInfo] section includes your topic settings, names
and objectives. The exam question have [ExamQuestionxx] as their section
title. The two-digit number in the section title is the AcroEdit assigned
question number. That number preceded by the three-digit topic number
and a hyphen form the question number that appears on screen at run time.
Formative questions have [FormQuestinxx] as their section title.
Checking
Dependent Course Files
Select the 'File
Check' button from the Course Page to identify, printout and verify that
the course files exist. At the Course Dependent File Checking page select
'Print' to print the listed files. Selecting 'Check' produces a list of
files that were not found in the expected locations. Use the 'Back' button
to return to the previous course file list or screen. The file check and
list functions identify the files that have been formally linked to the
course using AcroEdit. You may have additional files associated with courses
such as external movie and sound files associated with a PowerPoint presentation
or graphics needed for an HTML file.
Chapter
3 - AcroTrain Administration
Use the'Admin'utility
to perform administrative functions for learner records, course information,
generating exams or assessments and generating reports.
Using
AcroAdmin
Upon launching
the 'Admin' utility, you have four options from the main menu: 'Learner Management,'
'Generate Exams,' 'Create Reports' and 'View Comments.'
Viewing
Learner Records and Editing Registration
To view learner
records and edit their course registration, click the 'Learner Management'
button; then select learners from a list or sort them by the course for which
they are registered. After selecting a learner, the 'Learner Records' screen
appears and allows you to view course information and to:
- Select a new
learner
- Edit learner
password
- Add/Edit/Delete
learners and learner data
a. Add
learners
b. Import
learners from an existing database
c. Delete
learners
d. Edit
learner data
e. Register
learners for courses
f. Add
external course information for learners
- Remove exams
and assessments that the learner has taken
- Remove exam,
assessment and course records
- Generate learner
reports and
- Select another
learner.
WARNING
- Exercise caution when removing exam, assessment and course records. A 'safe'
approach is to temporarily suspend use of the AcroTrain system, then make
a backup copy of your entire records folder. After deleting records, verify
that only the correct records were deleted before returning the system to
service. The 'Remove Records' function includes copying the removed files
to the folder RcdDel in a subfolder structure that matches the records structure.
The RcdDel folder is a subfolder off the AcroTrain root folder. If there is
a need to restore the deleted records, they may be manually copied to the
records folder.
Removing
course records has no affect on the learner's course registration status.
Use AcroAdmin if you wish to de-register the learner for the course or have
the learner de-register himself or herself.
- To select
a different learner, use the 'Select Learner' button. You will be asked
to select the learner either by a learners list or by the course in which
they are registered.
- To edit a
learner's password, use the 'Edit Learner Password' button. Then edit
the password in the dialog box that appears and press 'ENTER' when finished.
- To launch
the Course Administrative tool, click 'Add/Edit/Delete.' See the Course
Administrative Tool information below.
- To delete
a learner exam record click 'Remove Exams.'
- Click 'Remove
Records' to delete course records. The course records include the exam
and assessment records for the course.
- Click 'Generate
Learner Report' to view and print the learner summary and course data
reports.
Course
Administrative Tool
The Course Administrative
Tool provides several added learner management functions. Click the 'Add/Edit/Delete'
button on the AcroAdmin Learner Management screens.
Add Learners
Clicking 'Add Learners' takes you to the 'Adding user's information' screen.
Complete the required, and if desired, optional learner information.
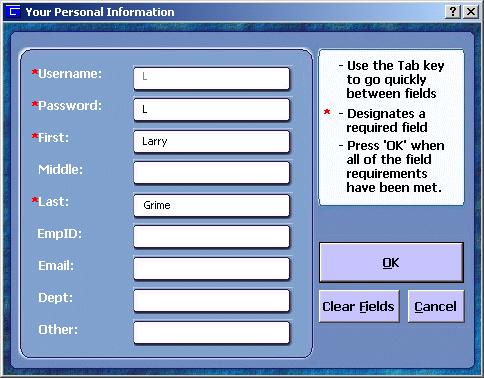
Import Learners from an Existing Database
You may import
existing learner data to log learners into the AcroTrain system. Supported
formats are '.csv' and '.txt' files. The delimiter must be either tabs
or commas. AcroTrain treats the first line in the file as a header line.
Example:
| UserName,
|
Password,
|
ID, |
FirstName,
|
LastName,
|
Email, |
Dept |
| JOEB, |
joeb, |
1111, |
Joe, |
Banannas, |
joeb@abc.com, |
Produce |
| Sally1,
|
139754, |
243987945,
|
Sally, |
Jones, |
sallyf@abc.com,
|
Bakery |
Since this example
uses commas as the delimiter, the actual file must exclude the tabs and
have either a '.csv' or '.txt' file extension. Without the tabs, the above
file appears as:
UserName,Password,ID,FirstName,LastName,Email,Dept
JOEB,joeb,1111,Joe,Banannas,joeb@abc.com,Produce
Sally1,139754,243987945,Sally,Jones,sallyf@abc.com,Bakery
The data format
must agree with restrictions in effect for the login data files. Punctuation
other than hyphens may cause unexpected results. Learners are prohibited
from using punctuation if they edit their data. Excessively long entries
will be truncated and may cause errors. Unsupported formats may cause
errors. You may find it helpful to first edit your data in a program such
as Excel to limit the data to the needed information. Them save the file
as a comma delimited or tab delimited file. Include only those data columns
that you will actually import in your file.
To import learners:
- From the
Course administrative Tool screen click 'Import Learners… .'
- Browse to
locate your 'csv' or '.txt' file. Set the delimiter in the upper right
region of the screen to indicate the delimiter.
- Follow the
three-step import process:
- Click
'Analyze file.' This loads the header information on the top left
panel and the AcroTrain standard headers on the lower left panel.
Drag the headers from your file to match the desired AcroTrain header.
Use all headers from your imported file to avoid load errors.
- Click
Find learners.' This loads the learners and their associated data
to the standard AcroTrain columns in the large panel on the right.
You may highlight and delete undesired records. Drag the header
column separators to revise column sizes. Double click the right
separator to expand the column to the width of the longest data
entry.
- Click
'Run import.' This imports the learner data. The import function
will prompt for duplicate usernames. The username must be unique,
and learners may not change their username. Learners may edit the
other learner information.
Click the exit X in the upper left-hand corner to return to the
Add Learner screen. Here you may select learners and register them
for courses.
Delete
Learners
To delete learners,
click the box to the left of the learners to be deleted, then right click
one of the learners. Select 'Delete learners' from the drop down menu. When
prompted to confirm your desire to delete a learner, a 'Yes' response will
delete the learner records and registration.
Edit
Learner Data
To edit learner
data, click the box to the left of the learner to be edited, then right
click the learner. Select 'Edit learner data …' from the drop down
menu. See 'Add Learners' above for the edit learner data screen.
Register
and Un-register Learners for Courses
To register learners
for courses, click the box to the left of the learner to be edited, and
then click the 'Register Learner(s)' button. At the Available Course screen,
click courses and learners to indicate the desired registrations or un-registerations.
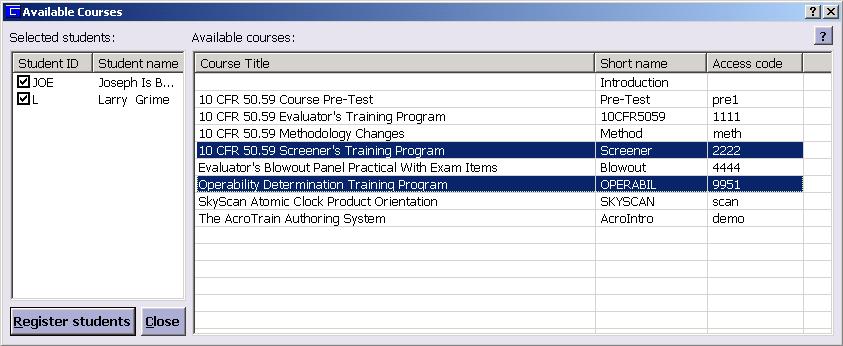
Add External Course Information for Learners
Use AcroAdmin
to keep instructor-led course records and records for other courses that
do not use AcroTrain. Independently record course completion status and
exam records.
- Select Learners
Click the box to the left of one or more learners, then right-click one
of the selected learners. Select 'Add instructor-led course info….'
From the drop down menu.
NOTE: The course information entered will be the same for all learners
selected as a group. Exam information can vary for each learner as it's
entered.
- Enter course
information:
NOTE: If only entering exam information, leave all course fields blank
and proceed to item 3, 'Enter exam information.'
- Enter
the course date by editing the indicated date or using the drop down
calendar. Edit the time information.
- Use the
drop down menu to select the course.
- Add desired
course comments.
- Indicate
the status.
- Click
'Save course data for all learners.'
- Reenter
data to replace the learner course record. (This action replaces the
complete course record, but not exam records.)
- Enter exam
information:
- Select
a learner to add exam information.
- Select
the course from the drop down menu.
- Select
the exam from the drop down menu, or add the exam name.
- Enter
the exam date by editing the indicated exam date or using the drop
down calendar. Edit the time information.
- Enter
the score.
- Click
'Record this score' to temporarily store and display the learner exam
information.
- Continue
to select learners and enter scores.
- Click
'Save all data' to save the exam information for all learners.
- Reenter
data to replace the learner exam information. This action replaces
the exam record, but not course records.
Creating
and Generating Assessments
AcroTrain permits numerous
assessment options: surveys, pre-test and summative exams that follow courses,
modules or topics. Six different report options and several review options
permit you to customize an assessment if desired. In addition to preesnting
the assessment questions you may include custom information with each assesment
to present before the learner starts the assessment and after they complete
it. You may keep it simple and add the special features when needed .
The three steps to create
an exam are definition, question selection and close options. The Assessment
Definintion page permits setting most exam parameters such as the name, number
of questions, type, run time options and reports. Question parameters provides
a question table of specifications and options to control priorities for randomly
generated assessments. If assessments will use fixed questions verses rendomly
generated question lists, the question selection process follows Assessment
Definition. Assessment close options include running custom programs to update
existing learner record systems, record data for easy administrator monitoring
and present certificates.
To create or generate
an assessment, click the 'Generate Exams' button; you will be asked to select
a course for the exam. After selecting a course, the Assessment Definition
page appears.
This page includes
the required Assessment Data setting function. It also features various options
such as compound assessments, paper exams, surveys, run-time options, learner
directions settings, reports, review options and partial course credit settings.

Saving
Assessment Settings
Click 'Apply' to save
the current assessment settings. Click 'OK' to save the current assessemtn
settings and proceed to the Assessment Question Specifications page. Use
the 'Clear' button to abandon changes and reset the page to the default
settings on page load.
Deleting
an Assessment
For assessents
that have been saved, click the 'Delete' button to delete the assessment
file. Once deleted the fle will no longer be accessible.
Modifying
Existing Assessments
Click the 'Select'
button to open an existing exam. This feature takes you to the exam summary
page. When modifying an existing exam, this and the several following pages
will offer a 'Skip' button. Use this button to proceed to the next function
without changing the existing exam.
Assessment
Data
Assessments must have
a name, an access code and a number of questions setting. Non-survey exams
must have a minimum passing score set as well. Click the 'Set Data' button
in the Assessment Data section to set or revise these parameters. Your exam
name is also the file name that stores your assessment. The assessment file
will include the '.txt' file extension. The 1 to 12 character assessment
access code is an alpha-numeric, non-case-sensitive word. Each exam for
the selected course must have a unique name and a unique access code. Exams
for different courses may have the same exam name and access code.
AcroAdmin determines the
number of questions by checking the topic files. Set the number of questions
at or below this number. The minimum score may be set to the desired whole
number percentage value of up to 100. For surveys, the minimum score setting
will not be used.
Compound
Assessments
You may create custom
assessment experiences for learners with the compound assessment function.
Uses include survey assessments that follow exams and multiple sequential
partial credit exams. Use the 'Select' button to first select a course for
the compound assessment to follow the current assessment. This can be the
same course as the course for the current assessment. Next, you will selct
the desired assessment from the assessment list for the selected course.
As learners take assessments
that follow the fist assessment, they will be taken directly to the assessment
initial screen. They will not need to enter an access code. With compound
assessments, the permitting multiple sessions setting is ignored.
Authoring
Hint - AcroTrain does not limit the number of sequential assessments. When
using the Client-Host function AcroTrain will have to transfer all courses
associated with the compound exams to the client system.
Assessment
Features
Paper
Assessments
AcroAdmin permits
printing or saving paper exams as .txt files. AcroAdmin may randomly generate
a paper exam or you may select the questions to include in your paper
exam. AcroTrain provides exams suitable for learner assessments and exam
answer keys that include your final feedback for each question.
WARNING
- Learners have access to the text folder where AcroTrain places your
paper exam files. Exam questions in the files are decrypted. Move paper
exams files to a secure location.
Surveys
Check the 'Make this
a survey' box if the questions to be asked in your assessment are to collect
date verses evaluate a learner's knowledge.
- AcroTrain will not
display reports even if selected since they are not intended to show
survey results. A single page appears when responders complete a survey.
- Exam question feedback
will be suppressed for all survey assessments. It is not necessary to
check this option.
- AcroTrain will not
give credit even if your exam settings include a course to credit.
- Any value shown for
minimum passing will not apply for a survey assessment.
- Add questions to
your assessment as with regular exams.
- If you use the summary
report feature with a survey, AcroTrain does not calculate or report
an overall score.
AUTHORING
TIPS - If you plan to use one survey repeatedly following a course, set
the assessment to 'Permit retakes' and 'Keep retakes silent.' These settings
will automatically overwrite the assessment record that gets stored with the
survey course. This record is not needed since the survey record also gets
stored with each course results file. Use AcroEdit to select the survey to
follow a course.
Use the compound
assessment feature to concatonate the survey to the course assessment.
AcroFinal will automatically launch the survey after the learner completes
the assessment reports.
To launch
a survey following a course
Permit
Retakes
Use 'Permit retakes'
for assessments that learners will be permitted to retake without communicating
with the administrator. If 'Keep retakes silent' is checked, learners
will not be notified that they are about to overwrite their assessment
record.
AUTHORING
TIP- If you wish to retain course assessment records, and also permit
learners to retake an assessment, then you should have multiple assessments
for the course. These could be the same assessment, but with a different name
and access code.
Suppress
Question Feedback
The default
AcroTrain exam question presents feedback immediately following each question.
This can efficiently provide positive feedback for learners who answer
correctly and remediation for those who answer incorrectly. To provide
immediate feedback, take no action.
To suppress
feedback following exam questions, click the 'Suppress exam question feedback'
checkbox. An alternative to immediate respose feedback is to require each
missed question to be reviewed following the assessment. See the 'Question
Reviews' discussion below.
Multiple
Session Assessments
By default
AcroTrain exams must be finished once started. Check the 'Permit multiple
sessions' box if you wish to permit learners to exit during an exam and
later return to the question they were on when they left. This option
is not permitted with compound assessments.
Intro
File
A html file may be presented
when learners launch an assessment. Click 'Select' and select the desired
html file from the available list. The html file must be in the course
presentations folder. Clear the intro file if you do not wish to include
an intro with the assessment.
Assessment
Directions
Check 'Show directions'
to include a directions page before starting the assessmetn questions.
Click 'Edit Directions' to revise the text that apears on this page.
Assessment
Summary Report
The assessment summary
report is one of several available reports to present to learners wen
they complete the assessment. As noted in the example below, you may include
custom comments on this assessment summary page. Click 'Edit Reports'
to revise the text that appears with this report.
Assessment
Final Page
The assessment final
page is a minimal information report that includes the learner's name
and a non-scrolling text box for your custom comments. You may select
a file that the learners can print from this page. The file to print must
be located in the course presentations folder. The file may be any file
that the learners will be able to print.
Question
Reviews
Each assessment can
have question review options set.
Partial
Course Credit Assessment Settings
AcroTrain provides several
options for awarding partial course credit based on assessment results. You
may award credit based on the score on questions from each course module;
the overall assessment score; or the score for designated keywords. The advance
credit may be for designated modules or with the overall evaluation option
for individual or multiple topics. Also, the course credited can be a different
course than the course providing the assessment questions. There are several
options available to present results to learners upon assessment completion.
When AcroTrain gives credit
for a module, it also gives credit for the modules topics. When learners initially
launch or return to the course, they will see the indication that they have
already completed the modules and topics for which they earned partial credit.
Taking such items will be optional. If a learner earns credit for all regular
modules and the credited course includes the automatically generated review
module, they will be able to satisfy the review module requirements by clicking
on the review module after they launch the course.
Reporting options when evaluating
assessments for partial credit, include the standard overall results report,
a modules credited summary report and a detailed module level results report.
In addition for assessment keyword evaluation verification purposes, AcroTrain
can include a questions correct and incorrect report with assessment details.
When testing assessment
partial crediting, take the assessments as a registered learner to permit
crediting verification. Individuals who 'audit' courses do not capture or
record the data needed to accomplish partial crediting.
Selecting
a Course to Credit on Assessment Completion
The three methods
for giving partial course credit will use the course designated through
the 'Select course to credit if learner passes' button.
Evaluate
Score for each Module
AcroTrain will evaluate
the correctly and incorrectly answered questions based on the question module
number. I.e., all questions from Module 01 will be evaluated against the
designated passing score criteria. If the Module 01 percentage correct meets
or exceeds the passing score, credit for Module 01 will be awarded.
This evaluation approach
supports fixed or randomly generated exams. If there are no questions for
a particular module, the learner will not receive credit for that module.
With a randomly generated exam, a module may receive credit based on the
result of only one question. To assure valid assessments, fixed exams may
provide better assurance of valid results. Learners receive credit for the
modules as well as the module topics.
AcroTrain includes several
report options for use with module-based assessments. The Modules Credit
report identifies the modules that the learner will receive credit for.
A variation of this report
is the report for learners who will receive no credit for a module since
they did not meet your minimum requirements. The report format is the same,
but the custom message is for use just when learners fail the assessment.
A module detailed report
is also available.
As shown, this report
includes the percent and number of questions correct for each module, the
module title, and if credit was awarded.
Evaluate
Overall Exam Score
The overall exam score
refers to the percentage correct answers for all assessment questions. AcroTrain
awards credit to topics and modules based on the selections entered when
generating the exam. To give different credits based on assessment outcomes
requires different assessments. The different assessments could be concatenated
onto the first assessment using the compound assessments feature described
above.
Evaluate
Using Keywords
Evaluating assessment
results using keywords permits developers to design focused assessments
with modules being credited based on objectives or other elements. Exam
questions can have keywords assigned. The keyword can be an objective number,
module number or other word to differentiate the knowledge and abilities
that the assessments must measure. The assessment identifies which keyword(s)
to evaluate and what score to use to determine if a module should receive
credit.
The AcroTrain keyword
evaluation approach is to check each correctly answered question keyword
against the keywords designated for each module. If a match is found, AcroTrain
increments the correct answer count and advances to the next question. After
evaluating the correctly answered questions, AcroTrain uses the same approach
to evaluate the incorrectly answered questions. Since questions may have
more than one keyword, and modules may be evaluated against the same keyword
as another module, the total number of questions evaluated may exceed the
total number of questions. Also, if a question does not have any of the
keywords designated for the modules, this can result in fewer questions
than the total of all assessment questions being used to determine partial
credit awards.
To verify that AcroTrain
interprets assessment results as intended, temporarily turn on the 'Show
question report' option. This report gets appended to the module detailed
report. See the 'Keywords Question Report' below for additional information.
Exam partial credit entries
must identify the module to credit, the keyword(s) to evaluate and the minimum
passing score. The multiple parameters require multiple delimiters to separate
the entries, Colons separate entries for different modules, commas separate
the module number, keyword group and passing score and semi-colons separate
the different keywords within the keyword group. Spaces will be deleted
from entries. Clicking the 'Accept' button records your entry in the exam
file and displays the keyword list.
Suggested steps to use
keyword evaluation
- Launch AcroEdit
- Create an 'exam only'
course or select the course with thedesired questions.
- Create the needed
questions and add the desired keywords to the questions.
- Launch AcroAdmin.
- Create an exam for
the course.
- Select the desired
course to credit.
- Select the 'Evaluate
using keywords' partial credit option.
- Enter the modules,
keywords and passing scores for the evaluation.
- Select the desired
report options.
- Enter other exam functions
such as number of questions, fixed or random etc.
- Save, then test the
exam.
Sample keywords report.
Keyword
Question Report
Check the 'Show question
report' box to the right of the 'Show Keywords Report' to receive a report
that includes detailed question data to assist troubleshooting assessments
with keywords. The report is not intended for presentation to learners.
It is provided for advanced users that may have a desire to evaluate the
'behind the sceens' data that determines how keywords are evaluated. At
run time, AcroFinal will append the question report to the Module Detailed
Report.
In the example shown below
the question report starts with the line "---CORRECTLY ANSWERED KEYWORDS
REPORT---." The module number, topic number and question number for
each correctly answered question follows. For example, question 01-020-02
is from Module 01, Topic 020 and question 02. The report follows this correctly
answered question list with a four digit number, the credited module number,
the question number and the question keyword that matched a keyword group
keyword. The four digit number are:
- The keyword group number.
In this example it happens to be the same as the module number. If you
created three keygroups using AcroAdmin, the report will first report
group one correctly answered question data then proceed to the second
group, followed by the third group. The report wil then show the results
for incorrectly answered questions.
- The second number is
the sequential question number based on the question's position in the
correctly answered questions list.
- The third number indicates
the position of the matched keyword in the question keywords list.
- The fourth number indicates
the position of the matched keyword in the keyword group.
For the example shown,
keyword group 1 was "01,Skill1;Skill2;Skill3,80," keygroup 2 was
"02,Objective1-2;Objective2-3,75" and the Question 01-020-01 keywords
were "Skill1,Objective1-2,Skill2."
The report numbers 1-3-1-1
tells us that for keyword group 1, the third correctly answered question's
first keyword matched the first keyword in keyword group 1. Notice that
question 3 does not appear again for keyword group 1 since AcroFinal considers
the first group match only. However, question 3 appears again with keyword
group 2 since the second question keyword, Objective 1-2, matched the first
group 2 keyword.
Assessment
Question Specifications
The Assessment
Question Specifcations presents a table of specifications for your course
questions and provides an opportunity to set topic priority and revise question
priority. The priority settings are for use with randomly generated assessments.
Click on a topic to revise its priority or to view the topic questin list.
Click on a question to revise its priority.
AcroAdmin stores
your topic priority settings in the exam file. However, the question priority
is stored with the topic file. This means that the question priority will
be the same for all assessments if more than one assessment uses the question.
Assessment
Types
The AcroTrain system
provides several options for generating assessments:
- Let AcroFinal
randomly generate the question list at run time
This option uses the topic and question priorities to generate the question
list when learners launch the assessment. The total available question count
should be two times the assessment question total to avoid excessive delays
in generating the question list at run time. To determine the approximate
assessment question list generation time on a computer like your computer,
use the 'Generate Random Question Now' button and note the time delay.
- Randomly generate
a question list and insert it into the assessment file
Use this option to generate a question list that will be inserted into the
assessment file or to test the random generation function. The total available
question count should be two times the assessment question total to avoid
excessive delays in generating the question list.
- Select the question
list
Clicking the 'Select Questions Explicity' button will present a screen listing
the available question and their titles. Click on question to add them to
the assessment question list. If a question has no title entered, a portion
of the question will be substituted for the title.
- Use all available
questions
This option provides a quick method to create an assessment that includes
all available questions.
Assessment
Close Options
In addition to
the various reporting options with assessments you can run a custom program,
append the completion data to a results summary file and present a completion
certificate.
Run
a Program on Assessment Completion
Run a program
on assessment completion to pass exam completion data to an external application.
AcroFinal will launch the selected program and pass several variables for
use in the external application.
Place the '.exe'
program in the root AcroTrain folder with the AcroTrain.exe program, then
launch AcroAdmin and go to the last exam setting page show below to designate
the program to run on exam completion. After the learner completes the exam,
AcroFinal will run the designated program with the following command line:
<File Location>\<Designated
Program> UserName,Student_Name,EmployeeNumber,RecordsDir,SettingsFile,StudentDir,
StudentFile,CourseFile,ShortTitle,LibrariesDir,Exam,Lesson_Status,Score,ExamName,StudentDirNo,First,Middle,Last,
Dept,Email,Other
<File Location>
is the root AcroTrain folder.
The Available
Data table in the Summary Report on Exam Completion section below
gives the description for most variables that AcroFinal passes to your
external application. The undocumented variables are the locations for
the records directory and other files used for custom advanced data collection
programs and the exam that is normally the same as the exam name. Contact
AcroServices for information on collecting additional data.
To view the
data passed by an exam, select the program 'ExamDate.exe.' This program
is intended only for use when testing and programming custom applications.
The default status
is no external file generated.
Assessment
Certificates
Each assessment
can include a custom certificate that is availabe to learners when they
view assessment reports. To define a certificate click the certificate 'Settings'
button on the Assessment close page. Follow the same certificate definition
process as with a course certificate. If AcroFinal encounters
both a course certificate and an assessment certificate, the assessment
certificate will be used.
Summary
Report on Exam Completion
The suggested
use for the external file is a single readily accessible source for the
course exam record. This file opens in, or can be imported into, Microsoft
Excel and numerous other programs that recognize the comma separated variable
format with a header. Administrators may transfer the results to other programs
after reviewing the data, and then delete the file. Or, the file may remain
and continue to collect learner data. This data is in addition to the other
summary and detailed records available for review with AcroAdmin.
Set the summary
report parameters from AcroAdmin's last exam setting page shown below. AcroFinal,
the AcroTrain e-Learning System exam run time executable file, will generate
a comma separated variable (.csv) file in the folder you designate. The
file includes a header line and you may define custom file content. With
each exam completion, AcroFinal appends the file with one data line. For
many Windows installations, opening a '.csv' file with Windows Explorer,
or a shortcut, opens the file in Microsoft Excel.
AUTHORING
TIP - When viewing the summary report file in applications such as Excel,
avoid saving any changes made while in the application, or save the file in
'.csv' format.
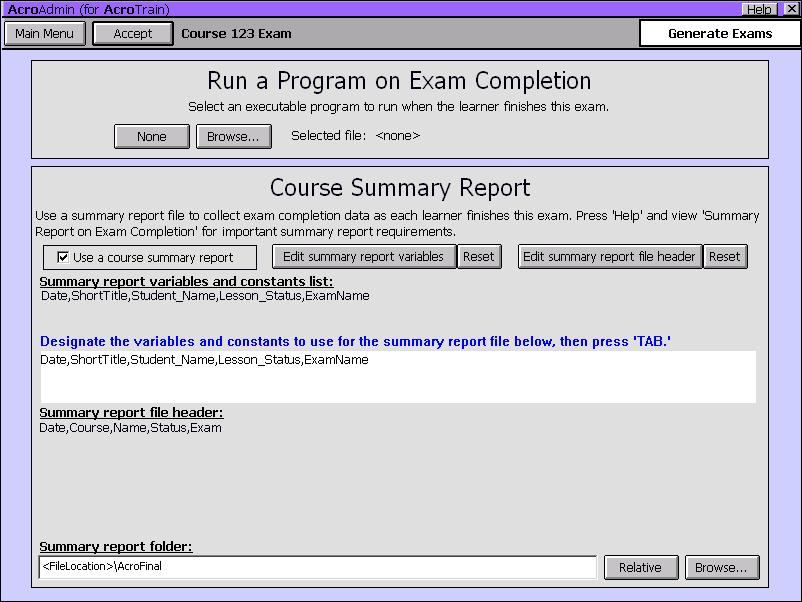
Available
Data:
| Variable
Name |
Description |
| UserName
|
One
word UserName used for AcroTrain login |
| Student_Name
|
Full
learner name |
| EmployeeNumber
|
Learner's
employee number |
| Lesson_Status
|
P
- passed or F- failed exam completion status |
| ShortTitle
|
The
course short title |
| Date |
The
learner's computer system date |
|
Score
|
The
percent correct |
| ExamName
|
The
exam name |
| StudentDirNo
|
The AcroTrain
assigned learner number used for learner records
|
| First |
First name
|
| Middle |
Middle
name or initial |
| Last |
Last
name |
| Dept |
Department
|
| Email |
E-mail
|
| Other |
Other learner
data
|
| |
|
| |
|
If you desire
to have AcroFinal generate the summary report as learners finish the exam,
you must designate the summary report file location. AcroFinal will create
the designated folder if it isn't found. The default file name is the course
short title followed by '.csv.'
Specify the desired
external file location by browsing to the desired file folder. If you wish
to locate the file relative to the AcroTrain location, click 'Relative.'
With the relative designation, AcroFinal will place the report in the subfolder
'AcroFinal.' Learners must have 'write' rights to the designated folder.
After setting
the results folder, click 'Set Results File' to select the results file
from the '.csv' files or to enter a new file name.
WARNING
- The external file can easily be read and revised by anyone with access
to the folder. We recommend that you limit learner access to this folder
to write rights only. Keep in mind that learners must have read rights to
most AcroTrain folders. Locating this file in the 'records' or 'library'
subfolders, or any file containing other learner records, may interfere
with AcroTrain functions.
Customizing the
summary report content:
You may change
the summary report information content and information sequence. If you
do not designate a custom variables and constants list and file header,
the default list and header will be the above variables from the Available
Data table. The variables and constants list tells AcroFinal what data to
include and in what sequence to store it. The file header list tells AcroFinal
what to call the data. Naturally there must be a one-to-one relationship
between the two lists.
- To control
the data included in each line of the summary report file, enter the words
for the desired variables, separated by commas, in the summary report
variables and constants list box. The commas separate the columns that
will appear in your report. Variables must be entered exactly as they
appear in the above Available Data table. To
enter a constant, such as a comment or alternate exam name, enter the
desired text instead of the variable. The text for each variable or constant
must be one word. Use '_' to connect characters. Avoid characters such
as spaces and commas, and be aware that other characters may have special
interpretations when another program receives your data.
- The file header
designates the names to use for each column in your summary report. The
sequence and total number of columns must be the same as the sequence
and total number of variables and constants in your list. However, you
may have different column names. Avoid characters such as spaces and commas,
and be aware that other characters may have special interpretations when
another program receives your data.
Example:
Summary report
variables and constants list :
Date,Student_Name,EmployeeNumber,Exam-123
Header:
Date,Full
Name,Number,Exam
This example
summary report file will contain the date in the first column, the learner's
name in the second column, the learner's employee number in the third column
and the constant, Exam-123, in the fourth column.
Copy summary
report formats:
AUTHORING
TIP - If you have multiple exams for a single course, use the same file
location to merge the results from the various exams. Also use the same header
and variables and constants list to avoid a mismatch. You may have all exams
write to the same file if desired.
If you wish to
use the same custom format for multiple exams, click the 'Copy' button,
and then browse to the exam with the desired format. Exam files are located
in the Exam subfolder off the course Text folder. The exam file name is
the exam name with a '.txt. extension.
Error messages:
Learners will
receive error messages if AcroFinal is unable to create the desired results
folder or if the write attempt indicated a failure to write to the external
file. Other system error messages may result.
WARNING
- If the external file is open, learners will receive an error message, and
their data will not be entered. If you must view the file when learners may
need to write records, make a copy, then view the copy.
If learners receive
an error message, AcroFinal will attempt to append the file after they close
the error message box. Usually, AcroFinal will make three attempts to append
the external file. If the conflict gets resolved before the learners continue,
this assures their exam data is included with the summary report. The third
attempt to write data may not produce an error message.
Auditing
Assessments
Click the 'Audit'
button to launch assessments for the selected course. See Audit
Mode for additional information.
Creating
Reports
The 'Create Report'
buttons permits administrators to access summary results, detailed question
data and detailed settings for a course. After clicking the 'Create Reports'
button, select the desired course. From the reports page you may continue
to the Pass/Fail Report page, the Question Report page or define the desired
settings report.
Report options
include on-screen viewing, printing and exporting to a file. With long reports,
the on-screen report may be trunctated. Use the external file option to assure
you have the complete report. The exported report file format varies depending
on the report. Most can easily be imported into Excel or Access.
Course
Settings Reports
After selecting
your course, select the modules and topics that you wish to include in the
report. Set the fields desired to limit your report content. The Course Settings
Report is exported as a html file. The following fields may be included in
a report:
General
Fields
- Records
Folder
- The login
type
- The 'Copy
to Local' setting
Course
Fields
- Course long
title
- Course short
title
- Libraries
Folder
- The 'Use
Resize' setting
- The 'Use
Intros' setting
- The 'Use
Review' setting
- The 'Use
Workshop' setting
- The 'Cover
Background' setting
- The course
access code
- The Background
Family being used for the course
- The 'Help
Type' setting
- The 'Light/Dark
Text' setting
- The 'Show
Objectives' setting
- The name
of the intro.HTML file
Module
Fields
- Module position
- Module prerequisite
list
- Module objectives
Topics
Fields
- Topic long
name
- Topic short
name
- Topic position
- Topic prerequisite
list
- Topic level
- Topic objectives
- PowerPoint
file name
- AcroHelp
file name
Question
Fields
- Question
title
- Question
type
- Question
text
- Learning
outcome
- Question
priority
- Choices
- Correct
answer
- Revision
information
- Hint/More
text
- Feedback
text
Use the toggle
all fields and toggle the field buttons group to rapidly make your selections.
After you click done, click the 'Generate Report' button at the next screen
to generate your report. Many reports take several minutes or more to generate.
To generate a report
for a specific learner, see the section early in this chapter on viewing learner
records and editing registration.
WARNING
- On the maximum permitted length for on screen reports may be exceeded without
notice. View the external reports to assure you have the complete data.
Pass/fail
and Question Reports
AcroAdmin includes
several on screen and export to files report options. These reports are
generated on demand and in addition to the optional external file discussed
above. External files are in HTML format. Import them into Excel or Access
to perform additional statistical analyses and related functions.
WARNING
- On the maximum permitted length for on screen reports may be exceeded without
notice. View the external reports to assure you have the complete data.
Pass/Fail
Report
The Pass/Fail report
summarizes assessment results for the selected course. You have the option
to limit the report to a particular assessment or view the results for all
assessments.
Question
Report
Question reports
provide detailed learner question response data: assessment, question number,
random sequence, response, correct response etc. Filter the report generator
to control the question type, assessment, date range or department. Question
reports are exported in a '.csv' format. On many systems, double-clicking
the file with Windows Exploreer will opoen the file in Excel.
Appendix
A - Settings Matrix
AcroTrain
Settings Matrix
|
Settings
|
Global
|
Course
Level
|
Module
Level
|
Topic
Level
|
Question
Level
|
Default
|
| Login |
X
|
-
|
-
|
-
|
--
|
Use
Name
Only
|
| Copy-to-Local |
X
|
-
|
-
|
-
|
--
|
No
|
| Records
Folder |
X
|
-
|
v-
|
---
|
--
|
Use
Relative
Path
|
| Access
Code |
-
|
X
|
--
|
--
|
--
|
User's
Choice
|
| Resize
Screen |
-
|
X
|
--
|
--
|
--
|
Yes
|
Cover
Desktop
with Black
|
--
|
X
|
-
|
-
|
-
|
Yes
|
| Exam
Only Course |
--
|
X
|
-
|
-
|
-
|
No
|
| Include
Exam |
--
|
X
|
-
|
-
|
--
|
Yes
|
| Use
Introduction |
--
|
X
|
-
|
-
|
-
|
No
|
| Use
Review |
--
|
X
|
-
|
-
|
-
|
Yes
|
| Use
Sound |
--
|
X
|
-
|
-
|
-
|
No
|
| Use
Access Code |
--
|
X
|
-
|
-
|
-
|
No
|
| Help
Format |
--
|
X
|
-
|
-
|
-
|
External
|
| Text |
--
|
X
|
-
|
-
|
-
|
Light
|
Libraries
Folder |
--
|
X
|
---
|
-
|
-
|
User's
Choice
|
| Other
folders |
--
|
X
|
-
|
-
|
-
|
Relative
|
Allow
Instructor
Mode |
--
|
X
|
-
|
-
|
-
|
Yes
|
Use
Certificate |
--
|
X
|
-
|
-
|
-
|
No
|
Dim
Objective
Button |
--
|
X
|
-
|
--
|
-
|
No
|
Show
Objectives |
--
|
X
|
-
|
-
|
-
|
Yes
|
| Course
Type |
--
|
X
|
-
|
-
|
-
|
User'
choice
|
Omit
Instructions |
--
|
X
|
-
|
-
|
-
|
No
|
| Use
web Help |
--
|
X
|
-
|
-
|
-
|
No
|
Include
Workshop |
--
|
X
|
--
|
-
|
-
|
No
|
Permit
Audit
Mode |
--
|
X
|
--
|
-
|
-
|
Yes
|
Background
Graphics |
--
|
X
|
-
|
-
|
-
|
Default
|
Menu
Position |
--
|
-
|
X
|
X
|
-
|
Order
Entered
|
| Prerequisites |
--
|
-
|
X
|
X
|
-
|
None
|
| Topic
Level |
--
|
-
|
-
|
X
|
-
|
Topic
|
| Learner
Outcome |
--
|
-
|
-
|
-
|
X
|
Other
|
| Question
Priority |
-
|
-
|
-
|
-
|
X
|
10
|
| Point
Value |
-
|
-
|
-
|
-
|
X
|
1
|
| Layout |
-
|
-
|
-
|
-
|
X
|
1
|
| Encrypt
|
-
|
-
|
-
|
-
|
X
|
No
|
| Settings |
Program
Level
|
Course
Level
|
Module
Level
|
Topic
Level
|
Question
Level
|
Default
|
Appendix
B - Troubleshooting and Errors
Anyone who works
with computers soon learns that occasionally things don't function as expected.
AcroTrain includes several features to avoid problems and others to resolve
problems when they occur. Also, the AcroTrain e-Learning System includes the
File Check and Log functions to assist troubleshooting problems.
AUTHORING
TIPS -To avoid errors always use AcroEdit and AcroAdmin to create and
revise course data and the system configuration. The AcroTrain files use an
'open' approach; experts may find it convenient to modify these files using
a text editor instead of the intended AcroTrain program. This is acceptable
for some functions. However, some changes, such as deleting learners from
the student.txt file can cause major system malfunctions.
Whatever
approach you use for editing, always test courses and changes thoroughly before
putting them into service.
Warnings During
Run Time
Learners may encounter
error messages when taking lessons. These errors may be from the Windows operating
system or from AcroTrain. The general approach used with AcroTrain learner
messages is to provide information that will permit the learner to resolve
the issue or to advise them to seek assistance from their administrator. Many
error messages include important information that will permit you to resolve
the issue or identify the issue if you need to contact AcroServices' technical
support.
One example of
an error situation is when writing the learner records to a common file following
exam completion. If the file is open when the program attempts to write to
the record, the error message shown below appears. If the administrator is
able to resolve the open file issue, the learner can click 'OK' and their
exam completion record will be written as expected.
When you encounter
error messages, record the entire message and the message title. If you are
unable to resolve the error contact AcroServices for support. Doing a screen
capture and e-mailing the message can be helpful.
Warnings When
Files Are Not Writeable or File Writing Failed
AcroEdit checks
the program settings, course and topic files to verify that they are not set
to read only when users attempt to change settings. Additional error checking
also will check some attempts to write to a file to verify that the action
was successful. If you receive a message indicating that a file is not writeable,
generally you will be able to keep AcroEdit running with the message displayed
while you resolve the issue.
If a file is copied
from a CD-ROM or across a network, it may be set to 'read-only' status. Other
possible situations that can block file saving by AcroEdit are: a lack of
write rights, and the file is open by another application. To change the 'read-only'
status, use Windows Explorer, and then, right-click the file > Properties
> uncheck Read-Only. If you suspect you lack write rights, see your network
administrator. If another application has opened the file, close the file
in the other application. After correcting the file error condition, return
to AcroEdit and click the message box to proceed. Some error boxes will reappear
several times to provide multiple opportunities to resolve a conflict without
loosing data.
File Check
Use the File
Check function to verify that files identified for your courses exist
in the expected folders. Access this function from the AcroEdit course selection
menu. Clicking the File Check button produces a list of dependent files for
the selected course.
WARNING
- Only file dependencies that are part of the AcroTrain e-Learning established
dependencies will appear in this list. For example, if your PowerPoint file
'depends' on external files such as movies or sound files, they will not be
listed or considered by AcroTrain when checking files.
Clicking
'Check' after
listing the dependent files will initiate a check for each dependent file.
AcroTrain will list the missing files.
Log
The Log
function records system events, selected errors encountered as learners take
courses and exams and information about the learner's computer such as process
speed and operating system. It may be helpful to troubleshoot timing related
issues, evaluate the speed advantages of different installations and obtain
additional data if a learner reports an error.
APPENDIX
C - TUTORIAL
Create
Your Own AcroTrain Course Tutorial
Use these instructions
to create your own course using the presentation and help files supplied for
this tutorial. You can then modify the supplied files to add your own content
or create a course using your own files. See the Administrator's Guide for detailed
instructions.
A. Using AcroEdit,
create a course.
- Launch AcroEdit
- Course Builder and Editor. (Launch AcroEdit using Windows Start > Programs
> AcroServices > AcroEdit - Demo.)
- Type 'admin,'
or the designated password, and then press 'ENTER;' enter your name; and
then continue to the course authoring screen.
- At the 'Course'
authoring screen, click the 'Add' button. Follow the on-screen instructions
for entering the course information. Use whatever course title and access
code you wish. This is a 'Regular' course. Remember the access code or deselect
it below. AcroTrain will list the new course on the 'Course' authoring screen.
- At the 'Course'
authoring screen, click the 'Course Settings' button.
- At the 'Course
Settings' screen, click the 'Setup Directories…' button.
- At the Directories
Setting Screen, click the 'Default' button and answer 'Yes' to move the
.html files.
- Record the default
Presentations directory information.
- Click 'OK'
and answer 'Yes' and 'OK' as AcroTrain creates your course directories.
B. Relocate the PowerPoint
presentation files.
Leave AcroEdit
running and using My Computer or Windows Explorer move the files 'Tutorial
- Topic1.ppt through Tutorial -Topic5.ppt' from the Libraries\Presentations
subfolder of the AcroTrain installation to your just created course Presentations
directory, the Libraries\[Course short title]\Presentations subfolder. The
complete path to the presentation files usually is C:\Program Files\AcroServices\AcroTrain_4.0_Demo\Libraries\Presentations.
However, a different location may have been set during your AcroTrain demo
installation.
C. Add a module,
topics and questions to your course.
- Return to AcroEdit
and Click 'Continue to Modules.'
- At the 'Module'
authoring level screen, click the 'Add' button and follow the on-screen
instructions. When you finish, the module will be listed on the 'Module'
authoring screen.
- Click the 'Edit
Module Data' button. Add objective(s); modify the module data; or simply
click the 'Continue to Topics' button.
D. Add topics and
questions to your course
- At the 'Topic'
authoring level screen, click the 'Add' button. Follow the on-screen instructions
and enter the topic information. When you finish, your topic will be listed
on the 'Topic' authoring screen.
- Click the 'Edit
Topic Data' button.
- Click 'PowerPoint®
File;' highlight 'Tutorial-Topic 1.ppt;' and then click 'OK.' (The files
moved in section B above will appear in the selection box.)
- Click 'AcroHelp™
File;' highlight 'Tutorial-Topic 1.html;' and then click 'OK.'
- Click 'Continue.'
You may enter
formative and summative exercises for the topic. Learners complete formative
exercises after each topic presentation during the training. Use summative
exercises to generate exams and assessments. See the Administrator's Guide
for detailed information on exercises and exams.
Click the word
'Topic' in the Authoring Level box to return to the topic level. Repeat
section D four more times to add your second through fifth topics.
After you finish
entering topics and exercises, click the 'X' in the upper right corner and exit
the program, launch 'Log in' (Windows Start > Programs > AcroServices
> Login - Demo) to register for and view your course.
A
Final Note
AcroServices will
continue to improve this e-Learning system to meet the many diverse needs
of our users. Most of our updates and improvements can be attributed to direct
feedback from users. Your feedback is expected and welcome.
Please
send your comments to:
L.A. Grime & Associates, Inc., AcroServices
860 Sandalwood Road West
Perrysburg, OH 43551
Phone: 419.872.9999
acro@acroservices.com